1. 简介
对Nacos在CentOS中的安装还了解的话,请参考CentOS环境下安装Nacos。
在实际开发和运维支撑过程中,都遇到对服务中配置文件的管理,如果需要管理的配置文件数量较少,带来相关工作不是很多,当我们面对成百上千个配置文件需要管理,这想想都让人头疼,如果我们稍有不慎将文件改错、漏改以及配置不生效,瞬间让人怀疑人生。
所以面对此类场景,我们引入Nacos,在Nacos控制台上我们可以对健康状态管理,对服务治理,减轻分布式配置管理等方面的管控能力,以便进一步帮助用户降低管理微服务应用架构的成本。
2. 新建配置
2.1. data id规则
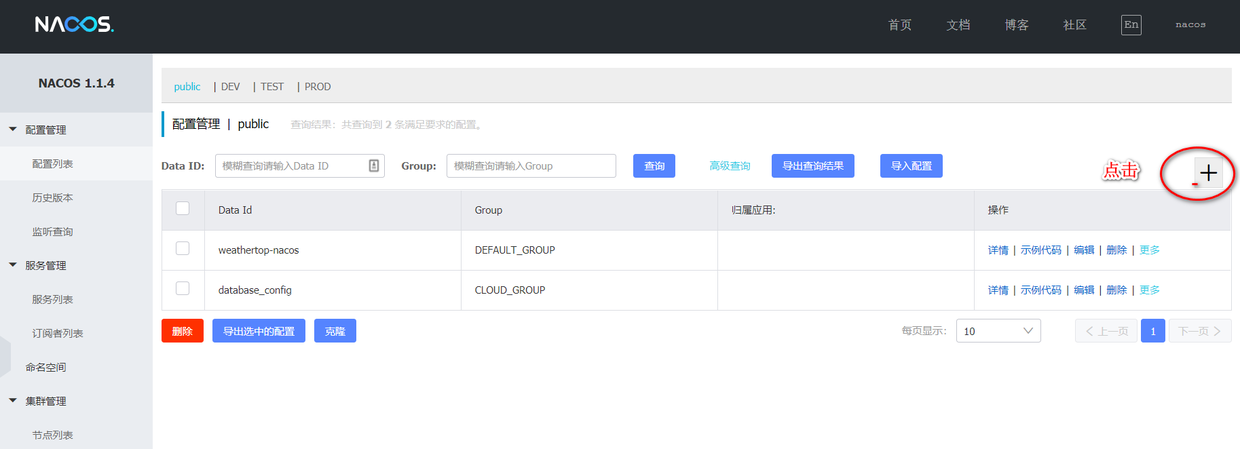
打开Nacos管理页面,打开:配置管理=>配置列表,新建配置,对于Data ID我们约定命名规则是:
${prefix}-${spring.profile.active}.${file-extension}
prefix 默认是spring.application.name,在SpringCloud中我们可以通过spring.cloud.nacos.config.prefix来配置
spring.profile.active当前环境对应的profile,通过spring.profile.active来配置
file-exetension为配置内容的数据格式,可以通过spring.cloud.nacos.config.file-extension来配置。截止当前只支持properties和yaml类型
当spring.profile.active未配置时,对应的连接符 - 也将不存在,dataId 的拼接格式变成 {prefix}.{file-extension}
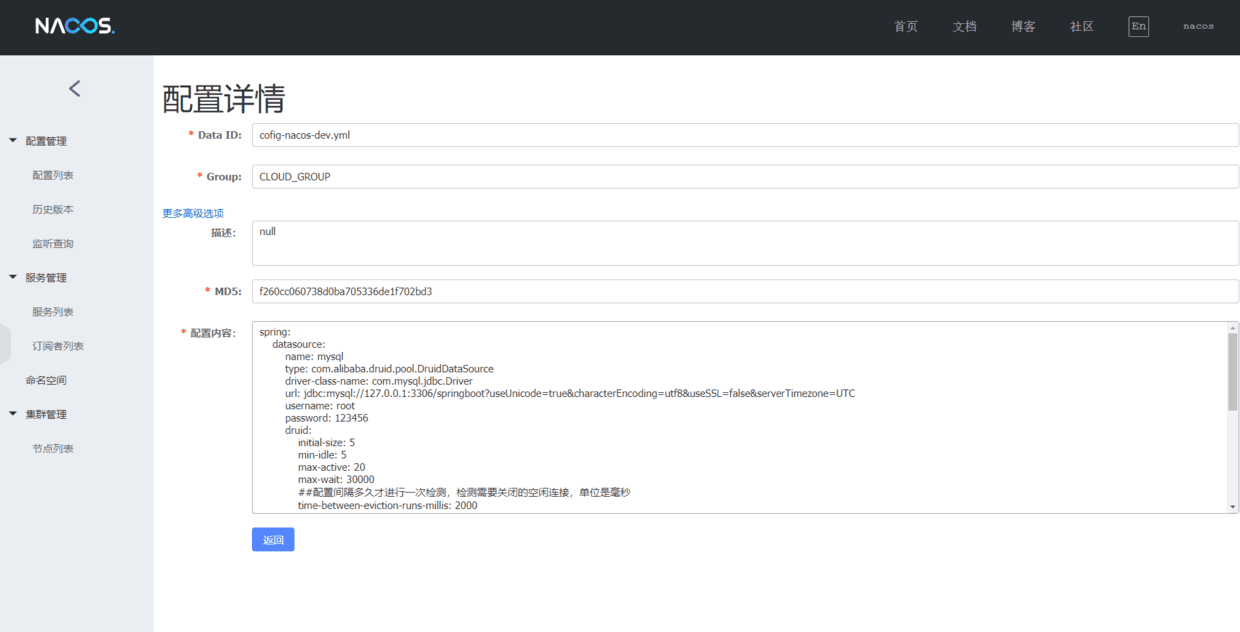
2.2. 创建配置文件
bootstrap.yml/bootstrap.properties,而不是application.yml/application.properties,如果了解Springboot应该都知道,这bootstrap和application在项目启动中,加载顺序有先后的,bootstrap的优先级是高于application。
3. 添加依赖
因为Springboot最新2.1.X版本集成spring-cloud-alibaba-dependencies会有一些问题,所以SpringBoot版本需要降级到2.0.X,这也是个坑呀,折腾了好久。经过查阅一些资料,稳定版本的列表如下
| Spring Cloud Version |
Spring Cloud Alibaba Version |
Spring Boot Version |
| Spring Cloud Greenwich |
2.1.1.RELEASE |
2.1.X.RELEASE |
| Spring Cloud Finchley |
2.0.1.RELEASE |
2.0.X.RELEASE |
| Spring Cloud Edgware |
1.5.1.RELEASE |
1.5.X.RELEASE |
Spring Cloud Alibaba,包含了它所使用的所有依赖的版本。版本之间的依赖列表
如果需要使用Spring Cloud Greenwich版本,在POM中的 添加
1
2
3
4
5
6
7
| <dependency>
<groupId>com.alibaba.cloud</groupId>
<artifactId>spring-cloud-alibaba-dependencies</artifactId>
<version>2.1.1.RELEASE</version>
<type>pom</type>
<scope>import</scope>
</dependency>
|
如果需要使用Spring Cloud Finchley版本,在POM中的 添加
1
2
3
4
5
6
7
| <dependency>
<groupId>com.alibaba.cloud</groupId>
<artifactId>spring-cloud-alibaba-dependencies</artifactId>
<version>2.0.1.RELEASE</version>
<type>pom</type>
<scope>import</scope>
</dependency>
|
如果需要使用Spring Cloud Edgware版本,在POM中的 添加
1
2
3
4
5
6
7
| <dependency>
<groupId>com.alibaba.cloud</groupId>
<artifactId>spring-cloud-alibaba-dependencies</artifactId>
<version>1.5.1.RELEASE</version>
<type>pom</type>
<scope>import</scope>
</dependency>
|
3.1. 父级依赖
1
2
3
4
5
6
7
8
9
10
11
12
13
14
15
16
17
18
19
20
21
22
23
24
25
26
27
28
29
30
31
32
| <properties>
<java.version>1.8</java.version>
<spring-boot.version>2.0.4.RELEASE</spring-boot.version>
<spring-cloud.version>Finchley.RELEASE</spring-cloud.version>
<nacos.version>0.2.2.RELEASE</nacos.version>
</properties>
<dependencyManagement>
<dependencies>
<dependency>
<groupId>org.springframework.cloud</groupId>
<artifactId>spring-cloud-dependencies</artifactId>
<version>${spring-cloud.version}</version>
<type>pom</type>
<scope>import</scope>
</dependency>
<dependency>
<groupId>org.springframework.boot</groupId>
<artifactId>spring-boot-dependencies</artifactId>
<version>${spring-boot.version}</version>
<type>pom</type>
<scope>import</scope>
</dependency>
<dependency>
<groupId>org.springframework.cloud</groupId>
<artifactId>spring-cloud-alibaba-dependencies</artifactId>
<version>${nacos.version}</version>
<type>pom</type>
<scope>import</scope>
</dependency>
</dependencies>
</dependencyManagement>
|
3.2. 依赖
1
2
3
4
| <dependency>
<groupId>org.springframework.cloud</groupId>
<artifactId>spring-cloud-starter-alibaba-nacos-config</artifactId>
</dependency>
|
4. resource文件
4.1. bootstrap.properties
由于bootstrap.properties在启动优先级高,所以将Nacos配置信息写这里。
1
2
3
4
5
6
| spring.application.name=cofig-nacos
spring.profiles.active=dev
spring.cloud.nacos.config.group=CLOUD_GROUP
spring.cloud.nacos.config.server-addr=192.168.147.132:8848
spring.cloud.nacos.config.prefix=${spring.application.name}
spring.cloud.nacos.config.file-extension=yml
|
- spring.cloud.nacos.config.server-addr:IP:PORT,生产环境这个应该是代理IP或者nacos的域名
- spring.cloud.nacos.config.group:指定你设置的组,默认为**
DEFAULT_GROUP**
4.2. application.yml
1
2
3
4
5
6
| server:
port: 9002
# 5. mybatis配置
mybatis:
mapperLocations: classpath:mapper/**/*.xml
|
6. 案例
为更好演示Nacos配置中心的效果,我这里将数据库配置都写在Nacos中,项目启动过程中自动获取配置中心的属性。
1
2
3
4
5
6
7
8
9
10
11
12
13
14
15
16
17
18
19
20
21
22
23
24
25
26
27
28
29
30
31
32
33
| spring:
datasource:
name: mysql
type: com.alibaba.druid.pool.DruidDataSource
driver-class-name: com.mysql.jdbc.Driver
url: jdbc:mysql://127.0.0.1:3306/springboot?useUnicode=true&characterEncoding=utf8&useSSL=false&serverTimezone=UTC
username: root
password: 123456
druid:
initial-size: 5
min-idle: 5
max-active: 20
max-wait: 30000
##配置间隔多久才进行一次检测,检测需要关闭的空闲连接,单位是毫秒
time-between-eviction-runs-millis: 2000
## 配置一个连接在池中最小生存的时间,单位是毫秒
min-evictable-idle-time-millis: 300000
max-evictable-idle-time-millis: 600000
remove-abandoned: true
remove-abandoned-timeout: 180
log-abandoned: false
validation-query: select 1
test-while-idle: true
test-on-borrow: true
test-on-return: true
keep-alive: true
phy-timeout-millis: 500
pool-prepared-statements: false
max-pool-prepared-statement-per-connection-size: 20
connectionProperties: druid.stat.mergeSql=true;druid.stat.slowSqlMillis=6000
page:
pageNum: 0
pageSize: 20
|
@RefreshScope实现配置自动更新
1
2
3
4
5
6
7
8
9
| @RefreshScope
@MapperScan(basePackages = {"xyz.wongs.weathertop.**.mapper"})
@SpringBootApplication(exclude = {DruidDataSourceAutoConfigure.class})
public class CloudConfigNacosApp {
public static void main(String[] args) {
SpringApplication.run(CloudConfigNacosApp.class,args);
}
}
|
7.Endpoint 信息查看
Springboot本身支持Endpoint,而Nacos Config同样也可以使用Endpoint来暴露信息。
在maven依赖中添加 spring-boot-starter-actuator依赖,并在配置中允许 Endpoints的访问。
- Spring Boot 1.x 中添加配置 management.security.enabled=false
- Spring Boot 2.x 中添加配置 management.endpoints.web.exposure.include=*
1
2
3
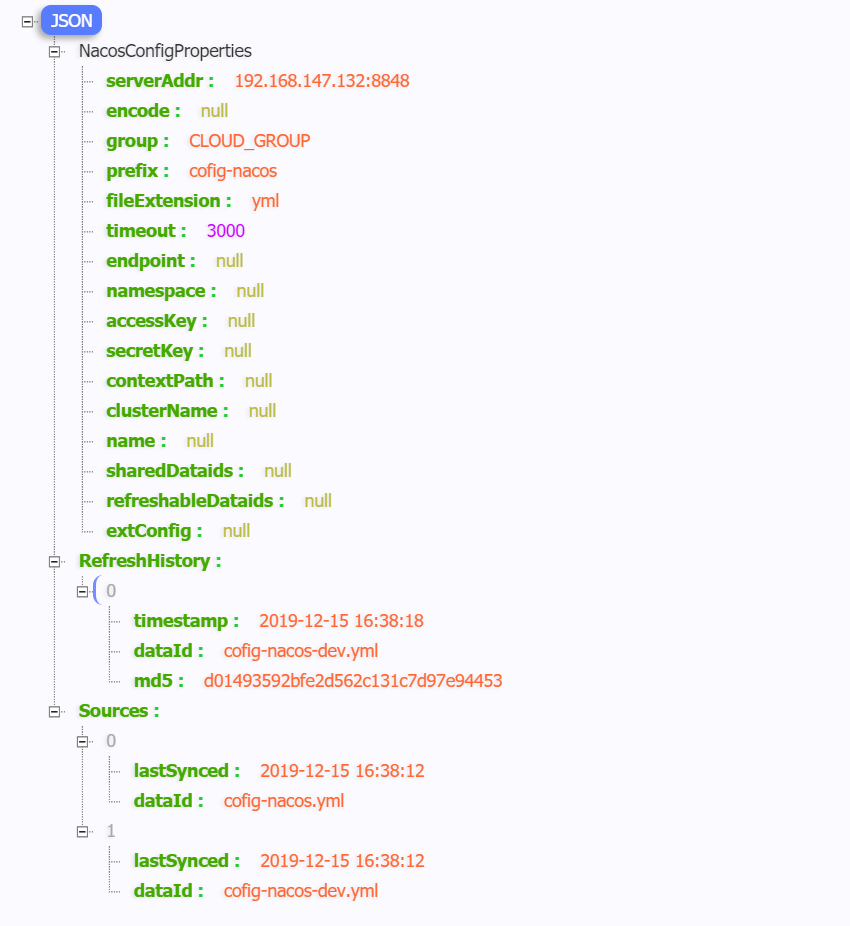
| Spring Boot 1.x 可以通过访问 http://localhost:9001/nacos_config来查看Nacos Endpoint 的信息。
Spring Boot 2.x 可以通过访问http://localhost:9001/actuator/nacos-config来访问。
|
8. 源码
Github演示源码 ,记得给Star