本文以SpringBoot2.2.2.RELEASE版本为基础做的分析。其他版本请自行参考官方文档。
1. 构建SpringBoot源码环境 本章节主要讲述通过下载Springboot源码构建springboot开发环境,并利用此开发环境完成单用例的开发。
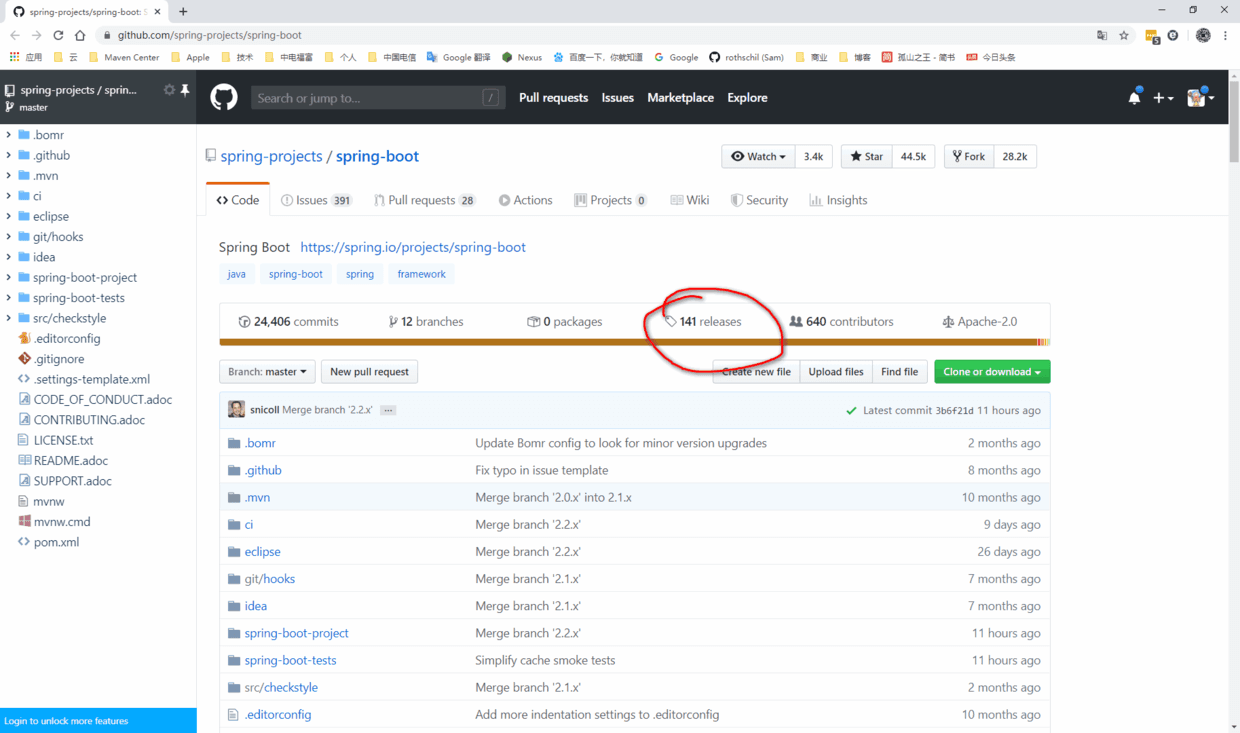
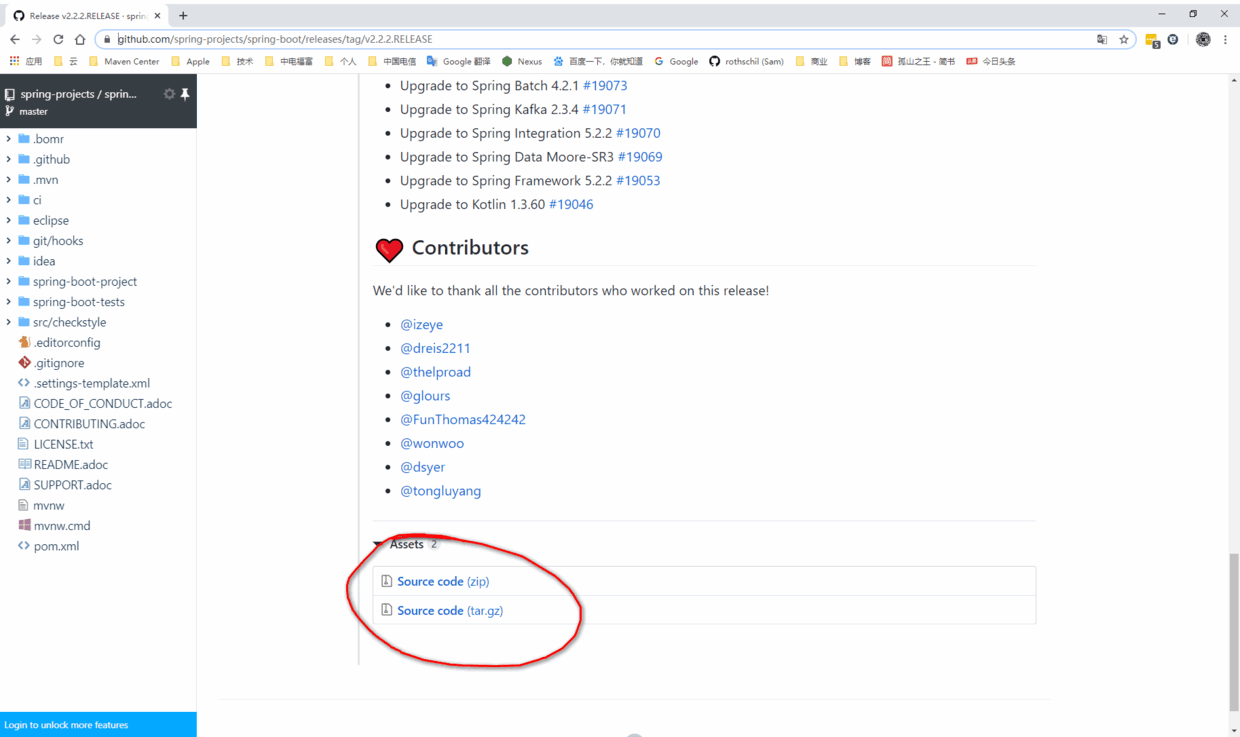
1.1. 下载源码 从Gihub仓库中Clone或者下载压缩包文件,Github地址为https://github.com/spring-projects/spring-boot ,因为当前最新的版本为2.2.2.RELEASE,所以我在release 中挑选压缩文件下载,下载后的文件名为spring-boot-2.2.2.RELEASE.zip
按照tag,找https://github.com/spring-projects/spring-boot/releases/tag/v2.2.2.RELEASE 。
下载后,解压文件到自定义目录,再执行:
1 mvn clean install -DskipTests -Pfast
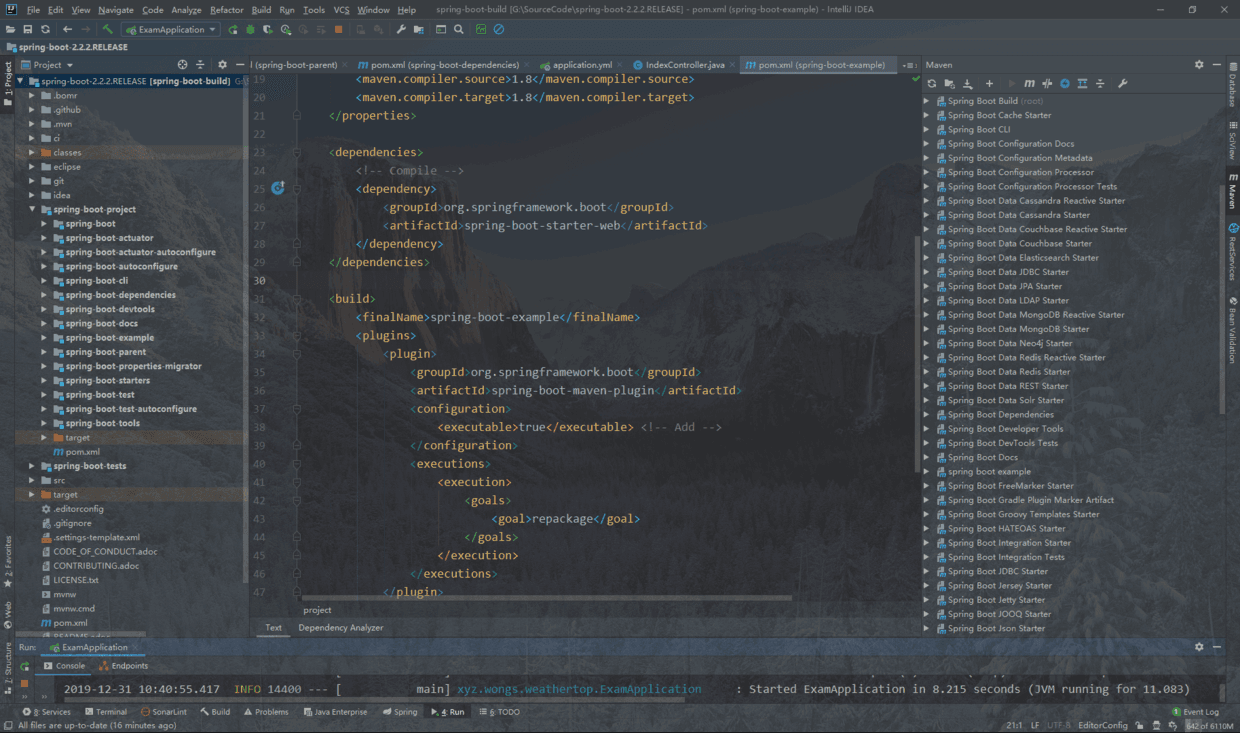
耐心等待所有依赖包下载完成,再将项目导入IDEA,即可完成源码环境构建。
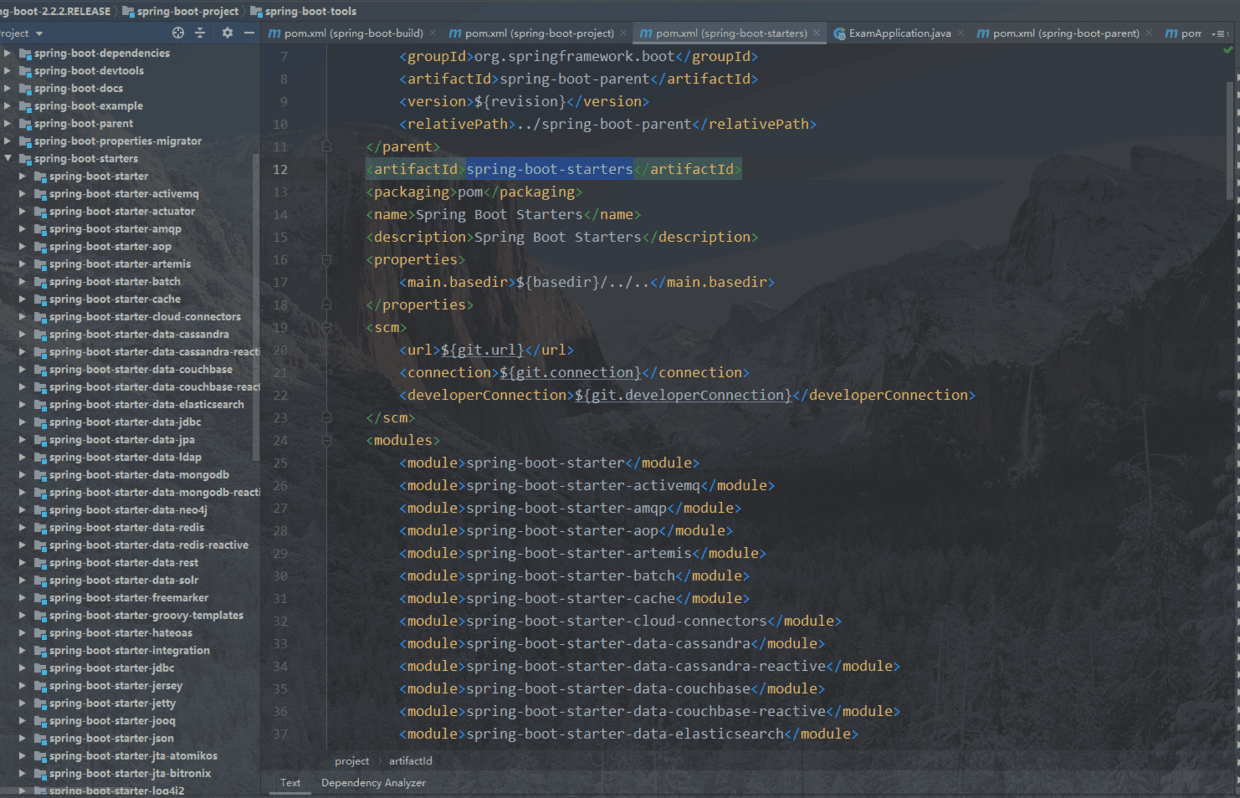
1.2. 核心父类模块 1.2.1. spring-boot-starters 1 2 3 4 5 6 7 8 9 10 <parent> <groupId>org.springframework.boot</groupId> <artifactId>spring-boot-dependencies</artifactId> <version>${revision}</version> <relativePath>../spring-boot-dependencies</relativePath> </parent> <artifactId>spring-boot-parent</artifactId> <packaging>pom</packaging> <name>Spring Boot Parent</name> <description>Spring Boot Parent</description>
这个模块打包POM,它也有上级spring-boot-dependencies ,我看2.2.2这个版本并没有定义starterspring-boot-starters 来定义。详细见下图:
1.2.2. spring-boot-dependencies 同样做了很多依赖包的定义,解决了我们开发过程中自己选择依赖包版本容易冲突的问题。
1.3. 新建样例 在spring-boot-project模块下新建Module,命名为spring-boot-example ,为了方便,一切从简,直接构建一个Application、Controller和yml文件。
1 2 3 4 5 6 7 8 9 10 11 12 13 14 15 16 17 18 19 20 21 22 23 24 25 26 27 28 29 30 31 32 33 34 35 36 37 38 39 40 41 42 43 44 45 46 47 48 49 50 51 52 53 54 55 56 57 <?xml version="1.0" encoding="UTF-8"?> <project xmlns="http://maven.apache.org/POM/4.0.0" xmlns:xsi="http://www.w3.org/2001/XMLSchema-instance" xsi:schemaLocation="http://maven.apache.org/POM/4.0.0 http://maven.apache.org/xsd/maven-4.0.0.xsd"> <parent> <groupId>org.springframework.boot</groupId> <artifactId>spring-boot-parent</artifactId> <version>${revision}</version> <relativePath>../spring-boot-parent</relativePath> </parent> <modelVersion>4.0.0</modelVersion> <artifactId>spring-boot-example</artifactId> <name>spring boot example</name> <packaging>jar</packaging> <properties> <project.build.sourceEncoding>UTF-8</project.build.sourceEncoding> <maven.compiler.source>1.8</maven.compiler.source> <maven.compiler.target>1.8</maven.compiler.target> </properties> <dependencies> <!-- Compile --> <dependency> <groupId>org.springframework.boot</groupId> <artifactId>spring-boot-starter-web</artifactId> </dependency> </dependencies> <build> <finalName>spring-boot-example</finalName> <plugins> <plugin> <groupId>org.springframework.boot</groupId> <artifactId>spring-boot-maven-plugin</artifactId> <configuration> <executable>true</executable> <!-- Add --> </configuration> <executions> <execution> <goals> <goal>repackage</goal> </goals> </execution> </executions> </plugin> <plugin> <groupId>org.apache.maven.plugins</groupId> <artifactId>maven-surefire-plugin</artifactId> <configuration> <useSystemClassLoader>false</useSystemClassLoader> </configuration> </plugin> </plugins> </build> </project>
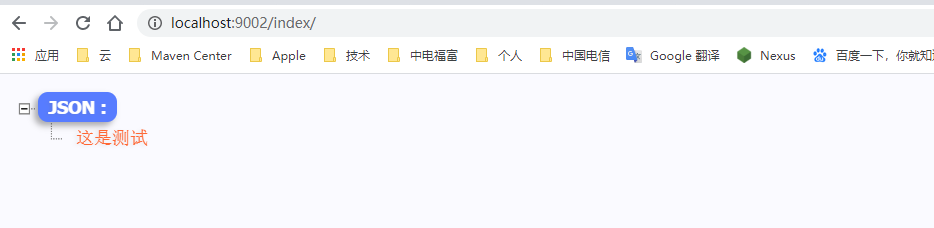
1 2 3 4 5 6 7 8 9 10 11 12 13 14 15 16 17 18 19 20 21 22 23 24 25 26 27 28 29 30 31 32 33 34 35 36 37 package xyz.wongs.weathertop; import org.springframework.boot.SpringApplication; import org.springframework.boot.autoconfigure.SpringBootApplication; @SpringBootApplication public class ExamApplication { public static void main(String[] args) { SpringApplication.run(ExamApplication.class,args); } } package xyz.wongs.weathertop; import org.springframework.http.MediaType; import org.springframework.web.bind.annotation.GetMapping; import org.springframework.web.bind.annotation.RequestMapping; import org.springframework.web.bind.annotation.RestController; import java.util.ArrayList; import java.util.List; @RestController @RequestMapping(value = "/index", produces = MediaType.APPLICATION_JSON_UTF8_VALUE) public class IndexController { @GetMapping(value = "/") public List index() { List list = new ArrayList(); list.add("这是测试"); return list; } }
1 2 3 4 5 6 7 server: port: 9002 spring: application: name: exam-web
启动ExamApplication,浏览器打开地址,http://localhost:9002/index/ ,即可看到效果。
1.4. 小结 以上我们利用SpringBoot源码构建一个完整Web应用,让大家熟悉下Springboot的目录结构,方便后一章节我们分析跟踪源码。
2. 源码分析 2.1. 主函数入口 1 2 3 4 5 6 7 8 9 10 11 12 13 14 package xyz.wongs.weathertop; import org.springframework.boot.SpringApplication; import org.springframework.boot.autoconfigure.SpringBootApplication; @SpringBootApplication public class ExamApplication { public static void main(String[] args) { SpringApplication.run(ExamApplication.class,args); } }
2.2. Maven依赖 1 2 3 4 <dependency> <groupId>org.springframework.boot</groupId> <artifactId>spring-boot-starter-web</artifactId> </dependency>
web的pom依赖,打开源码,它已经为我们继承好tomcat容器和spring-web、mvc的依赖。
1 2 3 4 5 6 7 8 9 10 11 12 13 14 15 16 17 18 19 20 21 22 23 24 25 26 27 28 29 30 31 32 <dependencies> <dependency> <groupId>org.springframework.boot</groupId> <artifactId>spring-boot-starter</artifactId> </dependency> <dependency> <groupId>org.springframework.boot</groupId> <artifactId>spring-boot-starter-json</artifactId> </dependency> <dependency> <groupId>org.springframework.boot</groupId> <artifactId>spring-boot-starter-tomcat</artifactId> </dependency> <dependency> <groupId>org.springframework.boot</groupId> <artifactId>spring-boot-starter-validation</artifactId> <exclusions> <exclusion> <groupId>org.apache.tomcat.embed</groupId> <artifactId>tomcat-embed-el</artifactId> </exclusion> </exclusions> </dependency> <dependency> <groupId>org.springframework</groupId> <artifactId>spring-web</artifactId> </dependency> <dependency> <groupId>org.springframework</groupId> <artifactId>spring-webmvc</artifactId> </dependency> </dependencies>
2.3. 依赖分析 在当前模块执行mvn dependency:tree,分析下依赖包,我们可以看到,这一层为我们融合很多,试想一下,如果这些都让我们自己挨个去做,不可想象。
1 2 3 4 5 6 7 8 9 10 11 12 13 14 15 16 17 18 19 20 21 22 23 24 25 26 27 28 29 30 31 32 33 34 35 36 37 38 39 40 41 42 43 44 45 46 47 48 49 50 51 52 53 54 55 56 57 58 59 60 61 62 63 64 $ mvn dependency:tree [INFO] Scanning for projects... [INFO] [INFO] ------------------------------------------------------------------------ [INFO] Building spring boot example 2.2.2.RELEASE [INFO] ------------------------------------------------------------------------ [INFO] [INFO] --- maven-dependency-plugin:3.1.1:tree (default-cli) @ spring-boot-example --- [INFO] org.springframework.boot:spring-boot-example:jar:2.2.2.RELEASE [INFO] +- org.springframework.boot:spring-boot-starter-web:jar:2.2.2.RELEASE:compile [INFO] | +- org.springframework.boot:spring-boot-starter:jar:2.2.2.RELEASE:compile [INFO] | | +- org.springframework.boot:spring-boot:jar:2.2.2.RELEASE:compile [INFO] | | +- org.springframework.boot:spring-boot-autoconfigure:jar:2.2.2.RELEASE:compile [INFO] | | +- org.springframework.boot:spring-boot-starter-logging:jar:2.2.2.RELEASE:compile [INFO] | | | +- ch.qos.logback:logback-classic:jar:1.2.3:compile [INFO] | | | | +- ch.qos.logback:logback-core:jar:1.2.3:compile [INFO] | | | | \- org.slf4j:slf4j-api:jar:1.7.29:compile [INFO] | | | +- org.apache.logging.log4j:log4j-to-slf4j:jar:2.12.1:compile [INFO] | | | | \- org.apache.logging.log4j:log4j-api:jar:2.12.1:compile [INFO] | | | \- org.slf4j:jul-to-slf4j:jar:1.7.29:compile [INFO] | | +- jakarta.annotation:jakarta.annotation-api:jar:1.3.5:compile [INFO] | | \- org.yaml:snakeyaml:jar:1.25:runtime [INFO] | +- org.springframework.boot:spring-boot-starter-json:jar:2.2.2.RELEASE:compile [INFO] | | +- com.fasterxml.jackson.core:jackson-databind:jar:2.10.1:compile [INFO] | | | +- com.fasterxml.jackson.core:jackson-annotations:jar:2.10.1:compile [INFO] | | | \- com.fasterxml.jackson.core:jackson-core:jar:2.10.1:compile [INFO] | | +- com.fasterxml.jackson.datatype:jackson-datatype-jdk8:jar:2.10.1:compile [INFO] | | +- com.fasterxml.jackson.datatype:jackson-datatype-jsr310:jar:2.10.1:compile [INFO] | | \- com.fasterxml.jackson.module:jackson-module-parameter-names:jar:2.10.1:compile [INFO] | +- org.springframework.boot:spring-boot-starter-tomcat:jar:2.2.2.RELEASE:compile [INFO] | | +- org.apache.tomcat.embed:tomcat-embed-core:jar:9.0.29:compile [INFO] | | +- org.apache.tomcat.embed:tomcat-embed-el:jar:9.0.29:compile [INFO] | | \- org.apache.tomcat.embed:tomcat-embed-websocket:jar:9.0.29:compile [INFO] | +- org.springframework.boot:spring-boot-starter-validation:jar:2.2.2.RELEASE:compile [INFO] | | +- jakarta.validation:jakarta.validation-api:jar:2.0.1:compile [INFO] | | \- org.hibernate.validator:hibernate-validator:jar:6.0.18.Final:compile [INFO] | | +- org.jboss.logging:jboss-logging:jar:3.4.1.Final:compile [INFO] | | \- com.fasterxml:classmate:jar:1.5.1:compile [INFO] | +- org.springframework:spring-web:jar:5.2.2.RELEASE:compile [INFO] | | \- org.springframework:spring-beans:jar:5.2.2.RELEASE:compile [INFO] | \- org.springframework:spring-webmvc:jar:5.2.2.RELEASE:compile [INFO] | +- org.springframework:spring-aop:jar:5.2.2.RELEASE:compile [INFO] | +- org.springframework:spring-context:jar:5.2.2.RELEASE:compile [INFO] | \- org.springframework:spring-expression:jar:5.2.2.RELEASE:compile [INFO] +- org.junit.jupiter:junit-jupiter:jar:5.5.2:test [INFO] | +- org.junit.jupiter:junit-jupiter-api:jar:5.5.2:test [INFO] | | +- org.opentest4j:opentest4j:jar:1.2.0:test [INFO] | | \- org.junit.platform:junit-platform-commons:jar:1.5.2:test [INFO] | +- org.junit.jupiter:junit-jupiter-params:jar:5.5.2:test [INFO] | \- org.junit.jupiter:junit-jupiter-engine:jar:5.5.2:test [INFO] +- org.junit.vintage:junit-vintage-engine:jar:5.5.2:test [INFO] | +- org.apiguardian:apiguardian-api:jar:1.1.0:test [INFO] | +- org.junit.platform:junit-platform-engine:jar:1.5.2:test [INFO] | \- junit:junit:jar:4.12:test [INFO] +- org.mockito:mockito-junit-jupiter:jar:3.1.0:test [INFO] +- org.assertj:assertj-core:jar:3.13.2:test [INFO] +- org.mockito:mockito-core:jar:3.1.0:test [INFO] | +- net.bytebuddy:byte-buddy:jar:1.10.4:test [INFO] | +- net.bytebuddy:byte-buddy-agent:jar:1.10.4:test [INFO] | \- org.objenesis:objenesis:jar:2.6:test [INFO] +- org.hamcrest:hamcrest:jar:2.1:test [INFO] \- org.springframework:spring-test:jar:5.2.2.RELEASE:test [INFO] \- org.springframework:spring-core:jar:5.2.2.RELEASE:compile [INFO] \- org.springframework:spring-jcl:jar:5.2.2.RELEASE:compile
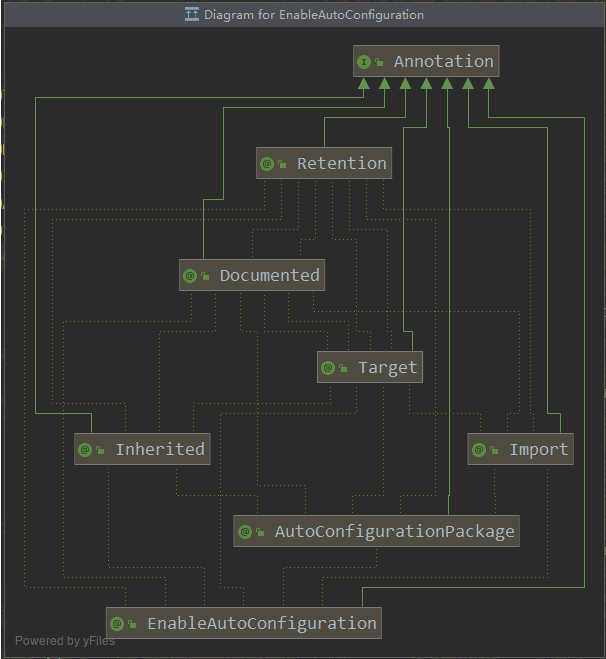
3. 重点知识 3.1. 注解 SpringBoot项目唯一入口就是上面的Application类,这个类有一个annotation注解SpringBootApplication 。
1 2 3 4 5 6 7 8 9 @Target(ElementType.TYPE) @Retention(RetentionPolicy.RUNTIME) @Documented @Inherited @SpringBootConfiguration @EnableAutoConfiguration @ComponentScan(excludeFilters = { @Filter(type = FilterType.CUSTOM, classes = TypeExcludeFilter.class), @Filter(type = FilterType.CUSTOM, classes = AutoConfigurationExcludeFilter.class) }) public @interface SpringBootApplication {
上面的注解有几个要重点说下
核心SpringBootConfiguration:源于Spring时代中的Configuration,都是将当前类标记为配置类,并将当前类以@Bean注解方法注入到Spring容器。默认允许在配置类中进行bean间引用以及对该配置的@Bean方法的外部调用。当proxyBeanMethods为false时候,等同于它删除@Configuration构造型
核心EnableAutoConfiguration:启用自动配置,帮助所有符合条件的Configuration都加载容器中。它的核心就是借助AutoConfigurationPackage 存储导入的基本包AutoConfigurationImportSelector 来实现Configuration列表的导出。
注:AutoConfigurationImportSelector.selectImports的实现方式上,在2.1和2.2之间有明显区别,这点大家看的过程中需要关注下。
1 2 3 4 5 6 7 8 9 10 11 12 13 14 15 16 17 18 19 20 21 22 23 24 25 26 27 28 29 30 31 32 33 34 35 36 37 38 public String[] selectImports(AnnotationMetadata annotationMetadata) { if (!isEnabled(annotationMetadata)) { return NO_IMPORTS; } AutoConfigurationMetadata autoConfigurationMetadata = AutoConfigurationMetadataLoader .loadMetadata(this.beanClassLoader); AutoConfigurationEntry autoConfigurationEntry = getAutoConfigurationEntry(autoConfigurationMetadata, annotationMetadata); return StringUtils.toStringArray(autoConfigurationEntry.getConfigurations()); } protected AutoConfigurationEntry getAutoConfigurationEntry(AutoConfigurationMetadata autoConfigurationMetadata, AnnotationMetadata annotationMetadata) { if (!isEnabled(annotationMetadata)) { return EMPTY_ENTRY; } AnnotationAttributes attributes = getAttributes(annotationMetadata); List<String> configurations = getCandidateConfigurations(annotationMetadata, attributes); configurations = removeDuplicates(configurations); Set<String> exclusions = getExclusions(annotationMetadata, attributes); checkExcludedClasses(configurations, exclusions); configurations.removeAll(exclusions); configurations = filter(configurations, autoConfigurationMetadata); fireAutoConfigurationImportEvents(configurations, exclusions); return new AutoConfigurationEntry(configurations, exclusions); } /** *核心就是用SpringFactoriesLoader 类的 loadFactoryNames()方法,加载ClassPath路径下META-INF/spring.factories,也就是“org.springframework.boot.autoconfigure.EnableAutoConfiguration=对应所有的导出类” * **/ protected List<String> getCandidateConfigurations(AnnotationMetadata metadata, AnnotationAttributes attributes) { List<String> configurations = SpringFactoriesLoader.loadFactoryNames(getSpringFactoriesLoaderFactoryClass(), getBeanClassLoader()); Assert.notEmpty(configurations, "No auto configuration classes found in META-INF/spring.factories. If you " + "are using a custom packaging, make sure that file is correct."); return configurations; }
也就是说EnableAutoConfiguration 会从classpath 路径下加载所有META-INF/spring.factories ,将spring.factories 文件中的EnableAutoConfiguration对应的类,通过反射机制实例化标注为@Configuration的容器类,然后即可完成依赖注入。
Target:用于描述类、接口(包括注解类型) 或enum声明,可选值有:1、FIELD-用于描述域;2、LOCAL_VARIABLE-用于描述局部变量;3、METHOD-用于描述方法;4、PACKAGE-用于描述包;5、PARAMETER-用于描述参数
Retention:用于描述生命周期,可选值有:1、SOURCE-只保留在源文件,当Java文件编译成class文件的时候,注解被遗弃;2、CLASS-被保留到class文件,但jvm加载class文件时候被遗弃,这是默认的生命周期;3、RUNTIME-注解不仅被保存到class文件中,jvm加载class文件之后,仍然存在
Documented:javadoc记录,这里略过
Inherited:具备可被继承的属性,即子类也有同样的注解
ComponentScan: 接触过传统spring的XML文件,我们应该熟悉标签context:component-scan ,即将特定的Bean批量注册到Spring容器中。常用的Bean包括:@Entity、@Service、@Controller、@Repository、@Component。它默认扫描SpringApplication的run方法里的Booter.class所在的包路径下文件,所以实际运用中把该启动类放到包的根路径。
3.2. 构造函数部分 main函数,main中的SpringApplication.run启动整个web应用,打开run对应类与方法,差不多入口都是一些静态方法。
1 2 3 4 5 6 7 8 9 10 11 12 13 14 15 16 17 18 19 20 21 /** * Static helper that can be used to run a {@link SpringApplication} from the * specified source using default settings. * @param primarySource the primary source to load * @param args the application arguments (usually passed from a Java main method) * @return the running {@link ApplicationContext} */ public static ConfigurableApplicationContext run(Class<?> primarySource, String... args) { return run(new Class<?>[] { primarySource }, args); } /** * Static helper that can be used to run a {@link SpringApplication} from the * specified sources using default settings and user supplied arguments. * @param primarySources the primary sources to load * @param args the application arguments (usually passed from a Java main method) * @return the running {@link ApplicationContext} */ public static ConfigurableApplicationContext run(Class<?>[] primarySources, String[] args) { return new SpringApplication(primarySources).run(args); }
上面的**ConfigurableApplicationContext run(Class<?>[] primarySources, String[] args)**方法中利用构造函数初始化SpringApplication应用,并执行run。这就是我们要分析的入口。
3.2.1. 构造方法 SpringApplication 的核心构造函数,主要做了两件事来完成实例化操作:初始化上下文ApplicationContextInitializer 以及ApplicationListener 监听器。
1 2 3 4 5 6 7 8 9 10 11 12 13 public SpringApplication(ResourceLoader resourceLoader, Class<?>... primarySources) { this.resourceLoader = resourceLoader; Assert.notNull(primarySources, "PrimarySources must not be null"); this.primarySources = new LinkedHashSet<>(Arrays.asList(primarySources)); //判断是否是web程序(javax.servlet.Servlet和 //org.springframework.web.context.ConfigurableWebApplicationContext是否存在) this.webApplicationType = WebApplicationType.deduceFromClasspath(); setInitializers((Collection) getSpringFactoriesInstances(ApplicationContextInitializer.class)); setListeners((Collection) getSpringFactoriesInstances(ApplicationListener.class)); this.mainApplicationClass = deduceMainApplicationClass(); }
以下就是ApplicationContextInitializer 以及ApplicationListener 初始化操作的核心部分,乍一看ClassLoader 就大概清楚这是一个JDK原生类加载器。
1 2 3 4 5 6 7 8 private <T> Collection<T> getSpringFactoriesInstances(Class<T> type, Class<?>[] parameterTypes, Object... args) { ClassLoader classLoader = getClassLoader(); // Use names and ensure unique to protect against duplicates Set<String> names = new LinkedHashSet<>(SpringFactoriesLoader.loadFactoryNames(type, classLoader)); List<T> instances = createSpringFactoriesInstances(type, parameterTypes, classLoader, args, names); AnnotationAwareOrderComparator.sort(instances); return instances; }
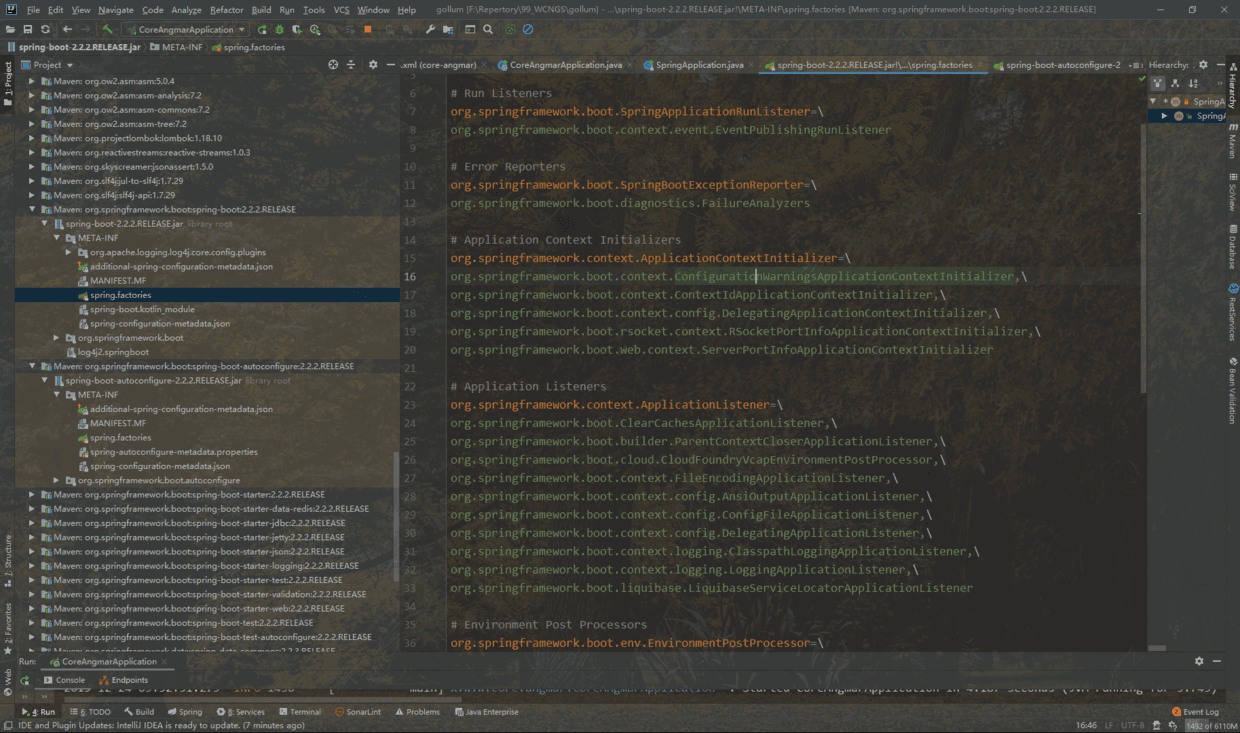
需要加载的Class路径写在META-INF/spring.factories 中,我们打开org.springframework.boot:spring-boot 和org.springframework.boo:spring-boot-autocofigure 两个jar包,看到键值对,这里我们只看ApplicationContextInitializer 和ApplicationListener 部分(“\”这是换行符),获取到实现类全名后交由SpringFactoriesLoader 加载。
3.2.2. spring.factories机制 在上一节,我们看到spring.factories,这种扩展机制实际上是仿照Java中的SPI(Service Provider Interface)扩展机制来实现的,它就是在META-INF/spring.factories ,获取指定接口的配置的功能。而ApplicationListener 就是在spring-core包中,它有两个核心方法:
1 2 public static <T> List<T> loadFactories(Class<T> factoryType, @Nullable ClassLoader classLoader); public static List<String> loadFactoryNames(Class<?> factoryType, @Nullable ClassLoader classLoader);
loadFactories: 通过类加载器加载指定的类并实例化
loadFactoryNames: 由类加载器根据自定义标准类获取其实现类的实例
这样Spring会遍历整个ClassLoader中所有jar包下的spring.factories文件,这样其实也为了方便开发人员自定义自己配置中spring.factories文件,这样做既不会影响到其它地方的配置,也不会被别人的配置覆盖,这也是官方推荐的做法。
3.3. 核心run方法简介 初始化上下文和监听器之后,就会进入run方法,它负责Spring的启动流程。
1 2 3 4 5 6 7 8 9 10 11 12 13 14 15 16 17 18 19 20 21 22 23 24 25 26 27 28 29 30 31 32 33 34 35 36 37 38 39 40 41 42 43 44 45 46 47 48 49 50 51 52 53 54 55 56 57 58 59 60 /** * Run the Spring application, creating and refreshing a new * {@link ApplicationContext}. * @param args the application arguments (usually passed from a Java main method) * @return a running {@link ApplicationContext} */ public ConfigurableApplicationContext run(String... args) { //1、创建计时器 StopWatch stopWatch = new StopWatch(); stopWatch.start(); ConfigurableApplicationContext context = null; Collection<SpringBootExceptionReporter> exceptionReporters = new ArrayList<>(); //2、设置headless模式 configureHeadlessProperty(); //3、获取META-INF/spring.factories,这里主要是SpringApplicationRunListener监听 SpringApplicationRunListeners listeners = getRunListeners(args); listeners.starting(); try { //4、将命令行输入的参数包装为ApplicationArguments ApplicationArguments applicationArguments = new DefaultApplicationArguments(args); //5、准备environment ConfigurableEnvironment environment = prepareEnvironment(listeners, applicationArguments); configureIgnoreBeanInfo(environment); //6、打印Banner,也就是我们看到的Springboot的Logo,如果有自定义,则覆盖模式 Banner printedBanner = printBanner(environment); //7、创建上下文ApplicationContext context = createApplicationContext(); //8、从META-INF/spring.factories 获取SpringBootExceptionReporter exceptionReporters = getSpringFactoriesInstances(SpringBootExceptionReporter.class, new Class[] { ConfigurableApplicationContext.class }, context); //9、准备上下文ApplicationContext prepareContext(context, environment, listeners, applicationArguments, printedBanner); //10、刷新上下文 refreshContext(context); afterRefresh(context, applicationArguments); stopWatch.stop(); if (this.logStartupInfo) { new StartupInfoLogger(this.mainApplicationClass).logStarted(getApplicationLog(), stopWatch); } //11、发布started事件 listeners.started(context); //12、执行所有Runners callRunners(context, applicationArguments); } catch (Throwable ex) { handleRunFailure(context, ex, exceptionReporters, listeners); throw new IllegalStateException(ex); } try { //13、发布running事件 listeners.running(context); } catch (Throwable ex) { handleRunFailure(context, ex, exceptionReporters, null); throw new IllegalStateException(ex); } return context; }
3.3.1. 创建计时器 org.springframework.util包下面一个工具类,主要用于对程序部分的模块进行计时(ms级别),一般用于同步单线程。作者:一个不二,标题:Spring计时器StopWatch使用
3.3.2. 设置headless模式 java.awt.headless是系统的一种配置模式。在该模式下,系统缺少显示设备、键盘或鼠标。尤其在面向服务器(如提供Web服务)往往可能缺少前述设备,但又需要使用他们提供的功能,生成相应的模拟数据,以提供给客户端(如浏览器所在的配有相关的、键盘和的主机)。
1 2 3 4 private void configureHeadlessProperty() { System.setProperty(SYSTEM_PROPERTY_JAVA_AWT_HEADLESS, System.getProperty(SYSTEM_PROPERTY_JAVA_AWT_HEADLESS, Boolean.toString(this.headless))); }
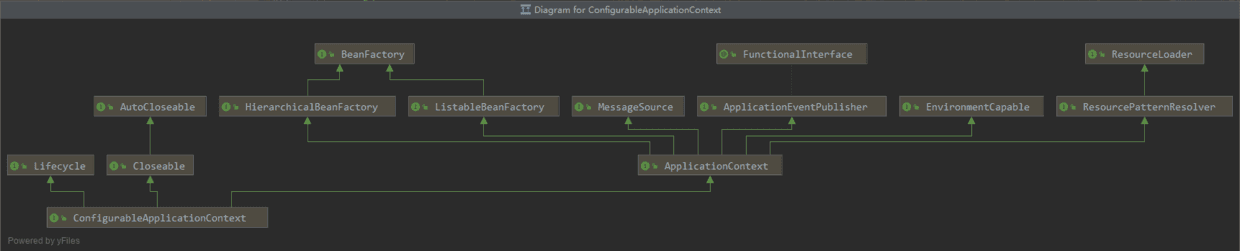
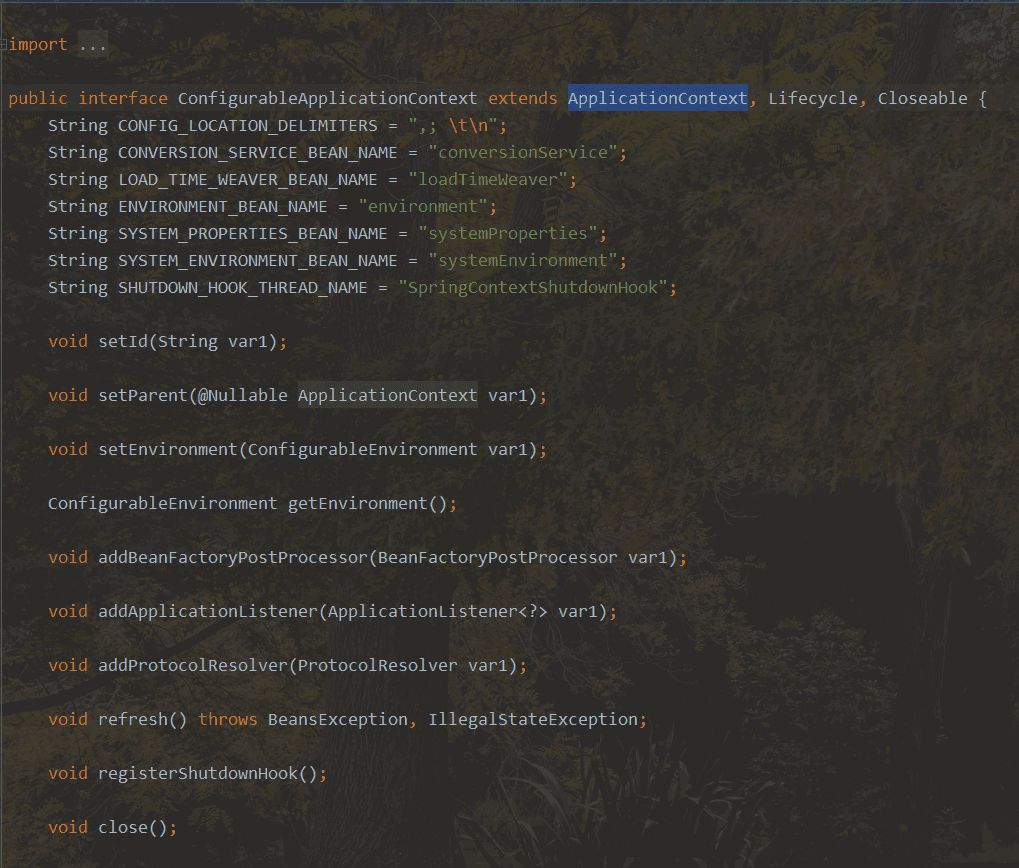
3.3.3. 获取SpringApplicationRunListener监听列表 3.4. ConfigurableApplicationContext部分
这是一个接口,对应在spring-context包中,它囊括ApplicationContext需要实现的所有接口,查看源码可知它继承ApplicationContext, Lifecycle, Closeable ,封装上下文的配置和生命周期管理,在启动和关闭容器过程中执行此操作。