在网上上我看已经有好多关于Elasticsearch的介绍,我就不在翻来覆去讲一些基本概念,大家感兴趣的可以自己去找一些资料巩固下。我这只为了顾及众多首次接触Elasticsearch,案例都讲的很浅显,还有就是受个人能力所限,实在写不出高大上的博文,各位读者发现有错误之处,还不要取笑我,给我指出来即可。
内容规划总共分为三个章节来写,分别运行环境构建、利用Web应用管理索引以及Web应用管理数据三大块来说明。
具体有:
一、SpringBoot集成Elasticsearch7.4 实战(一):这些操作都是在CentOS下操作的,主要带大家熟悉下Elasticsearch环境。
- 1.1.下载& Linux下ElasticSearch安装
- 1.2.中文分词插件IK
- 1.3.索引
- 1.4.如何数据管理
二、SpringBoot集成Elasticsearch7.4 实战(二):在Springboot环境下,利用JAVA环境操作索引。
- 2.1.新增索引
- 2.2.查询索引
- 2.3.删除索引
三、SpringBoot集成Elasticsearch7.4 实战(三):在Springboot环境下,管理数据。
- 3.1.WEB HTTP提交数据<单条提交、批量提交>
- 3.2.WEB HTTP方式条件查询
- 3.3.WEB HTTP删除数据

1. Linux单机安装
题外话,这一章节仅仅作为开发学习来构建基础的环境,并未考虑elasticsearch的高可用性,仅说明一些基础知识,带大家有一个认识。当然既然是自我发挥,也就是一家之言,难免有遗漏地方,希望大家也就本着看看。
1.1. 下载&安装
1.1.1. 环境需求
- CentOs7
- 内存4G+:这个因环境而异
- JDK11+:由于
elasticsearch运行需要JDK环境,我机器 JDK 版本是 11,如果 JDK 低于 9.0 会有一些问题,下图我也贴出来。
1 |
|
1.1.2. 下载
官方 elasticsearch 下载,下载 elasticsearch,目前最新的稳定版本为 7.4.0 版本。
1.1.3. 安装
- 下载
elasticsearch,会得到一个文件elasticsearch-X.X.X-linux-x86_64.tar.gz - 创建个文件夹
elastic - 再创建一个组,案例中我以
dev命名 - 再创建一个用户,
elasticsearch不允许使用root启动,创建一个新的用户elastic,并为这个账户赋予相应的权限来启动elasticsearch。 - 解压文件
- 将
elasticsearch-X.X.X-linux-x86_64.tar.gz文件移入elastic中 - 重新调整下权限
chown -R
1 |
|
1.1.4. 修改配置文件
配置文件中有很多配置项,例如集群信息、端口等。
elasticsearch 本身为安全考虑,默认不允许外部访问,我们这里做演示,就需要将这个配置项修改掉,路径在 config/elasticsearch.yml
1 |
|
修改后的效果如下:
1 |
|
1.1.5. JVM配置
由于 elasticsearch是 Java 开发的,所以可以通过 ${ES_HOME}/config/jvm.options 配置文件来设定JVM的相关设定。如果没有特殊需求按默认即可。
不过其中还是有两项最重要的-Xmx1g与-Xms1gJVM的最大最小内存。如果太小会导致Elasticsearch刚刚启动就立刻停止。太大会拖慢系统本身。
1.1.6. 启动&验证结果
- 启动
1 | [elastic@localhost elastic]$ ./bin/elasticsearch |
验证结果
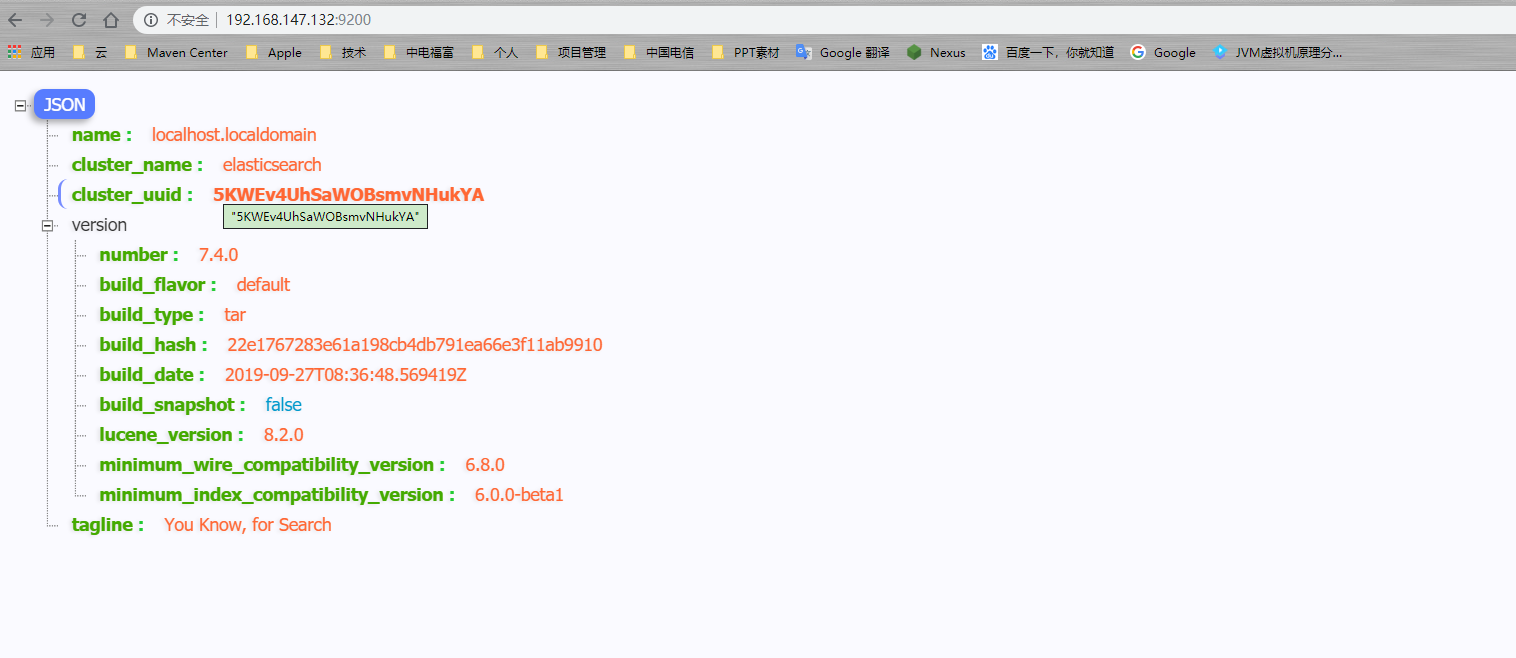
elasticsearch默认端口是 9200 ,打开地址:http://192.168.147.128:9200/
注意,启动后可能会有两种错误导致启动失败。

从中可以看出主要是打开时数量不够以及虚拟内存不足。
1 | [1]: max file descriptors [4096] for elasticsearch process is too low, increase to at least [65535] |
解决措施
- vi /etc/security/limits.conf
1 | elastic hard nofile 65536 |
其中 elastic 为启动 elasticsearch的用户名。
- vi /etc/sysctl.conf
1 | vm.max_map_count=655360 |
再执行 sysctl -p
最后对 elasticsearch进行重启。
1.1.7. 小结
从中我们看到, elasticsearch安装本身并不困难,比较简单,修改配置文件以及注意 JDK版本。
1.2. 可视化工具
elasticsearch 的可视化工具有很多,比如 elasticsearch-head、Dejavu、ElasticHD等。
此处选择 ElasticHD,比较适合学习以及演示,这是一个开源 elasticHD, Github下载地址
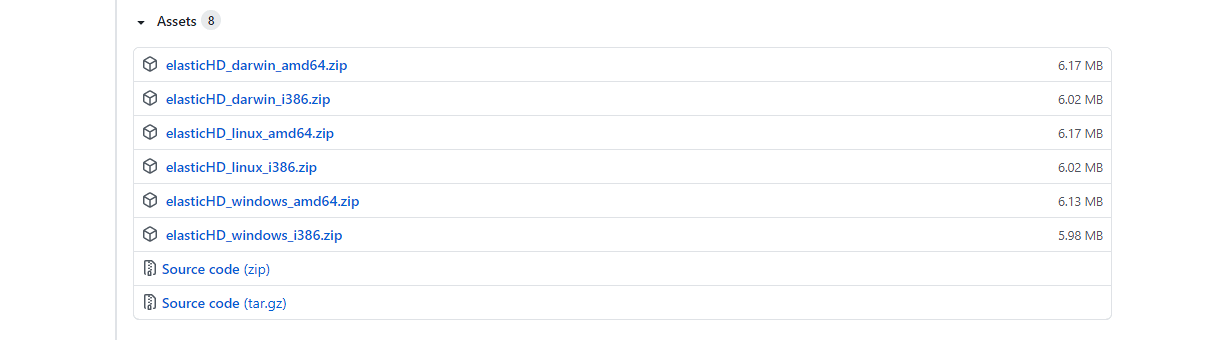
提供Windows和linux,但是这个版本有一个弊端,就是好久没更新,凑合着用呗。
1 | 1、unzip elasticHD_linux_amd64.zip |
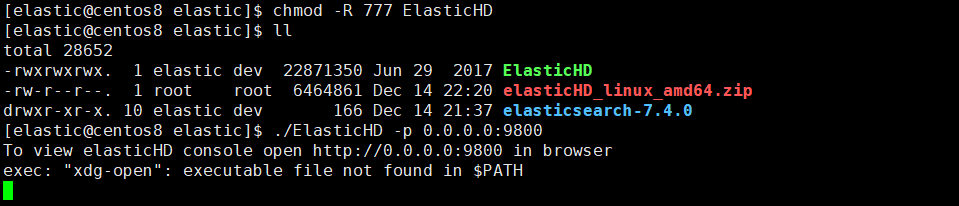
在浏览器中打开 http://192.168.244.128:9800/ 就可以看到。

1.3. 中文分词插件IK
elasticsearch 本身对中文支持不够好,所以需要中文的分词插件,目前主流的都用 IK。 以下这是 Google的中文词条。
IK Analyzer是一个开源的,基于java语言开发的轻量级的中文分词工具包。从2006年12月推出1.0版开始, IKAnalyzer已经推出了4个大版本。最初,它是以开源项目Luence为应用主体的,结合词典分词和文法分析算法的中文分词组件。从3.0版本开始,IK发展为面向Java的公用分词组件,独立于Lucene项目,同时提供了对Lucene的默认优化实现。在2012版本中,IK实现了简单的分词歧义排除算法,标志着IK分词器从单纯的词典分词向模拟语义分词衍化。
1.3.1. IK安装
安装地址,截止当前 IK 最新版本是 v7.4.0 ,但是我 elasticsearch 版本是 7.4所以下载与自己相对应的版本,否则分词插件将不能被识别。
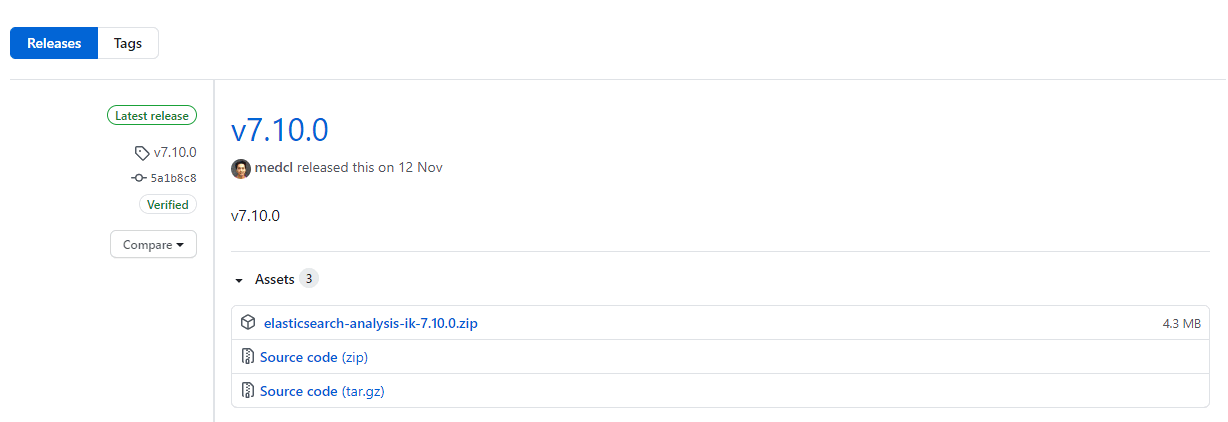
- 下载
1 | [root@localhost download]$ wget https://github.com/medcl/elasticsearch-analysis-ik/releases/download/v7.4.0/elasticsearch-analysis-ik-7.4.0.zip |
- 安装插件
在 elasticsearch 安装目录下 找到 plugins 文件夹并创建一个名为 ik的目录,将下载的 elasticsearch-analysis-ik-7.10.0.zip 移入。
1 | [elastic@localhost elastic]$ cd plugins |
完成后,将 elasticsearch 重启,我们观察控制台
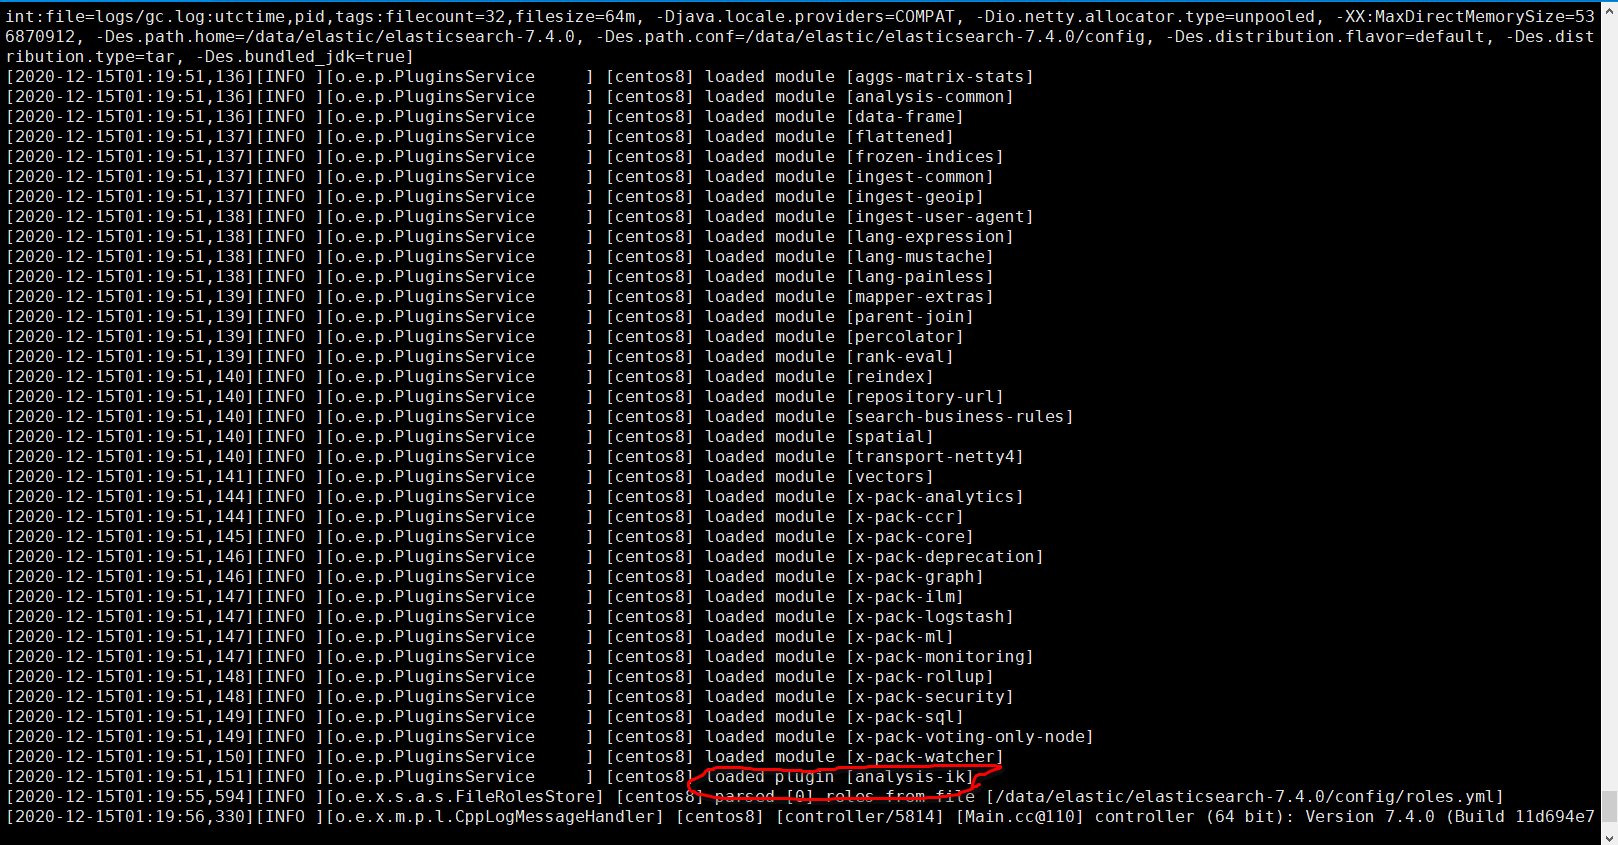
其中红线处就是 elasticsearch将分词器加载,说明我们安装成功。
1 | [2020-12-15T01:19:51,151][INFO ][o.e.p.PluginsService ] [centos8] loaded plugin [analysis-ik] |
1.3.2. 分词器
上一章节我们演示对中文分词的安装,下来我们开始我们分词器验证之旅。
使用crul命令,输入下面的URL地址,验证分词器是否成功。
1 | [elastic@localhost elastic]$ curl -X GET -H "Content-Type: application/json" "http://localhost:9200/_analyze?pretty=true" -d'{"text":"中华五千年华夏"}'; |
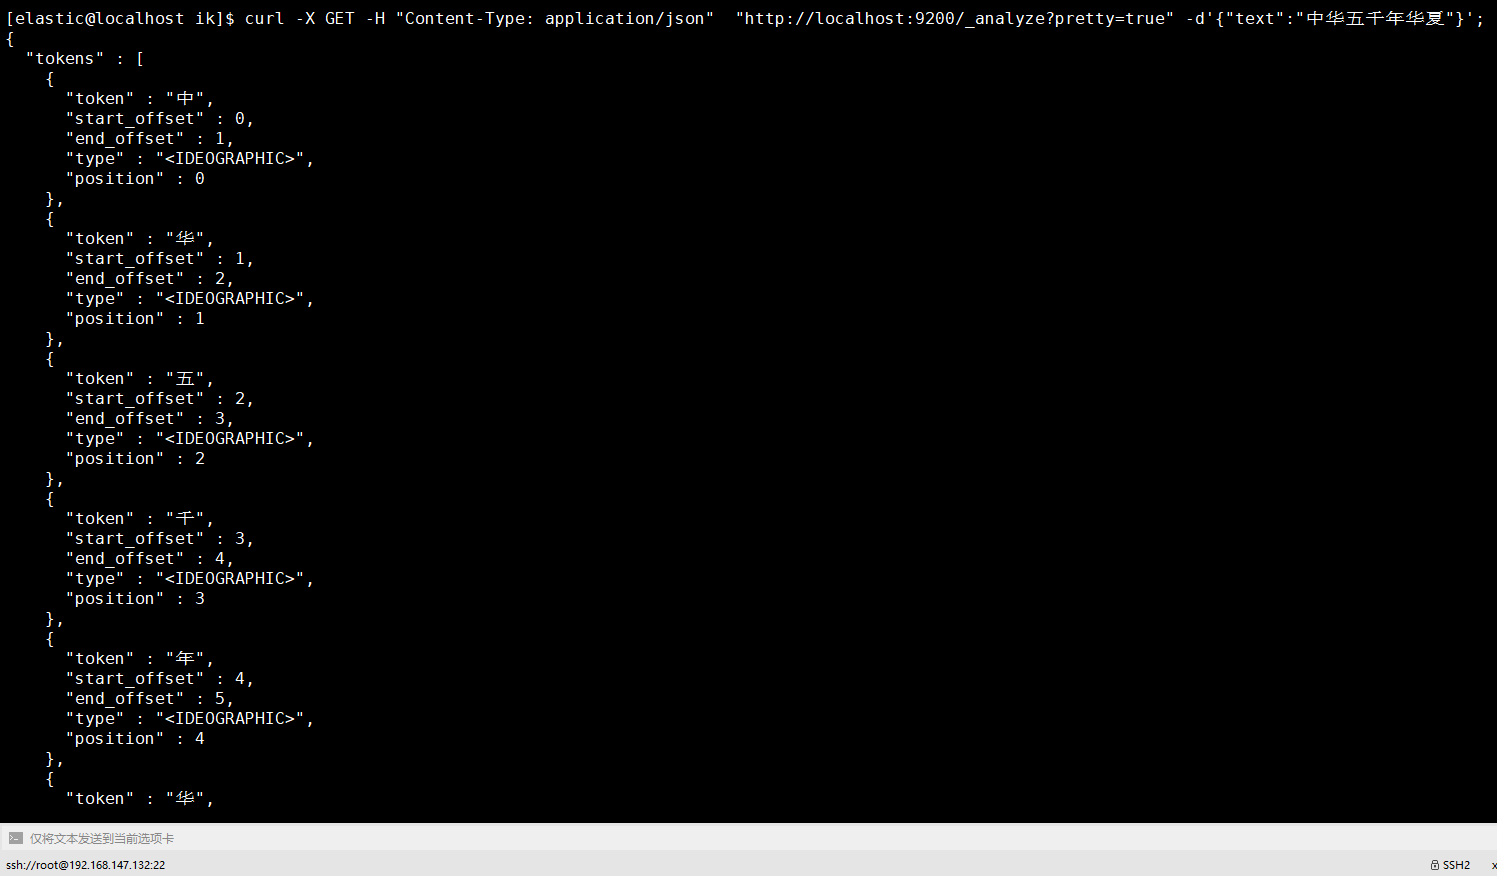
有的人喜欢 Postman,也可以。
至此我们的中文分词器可以用啦。
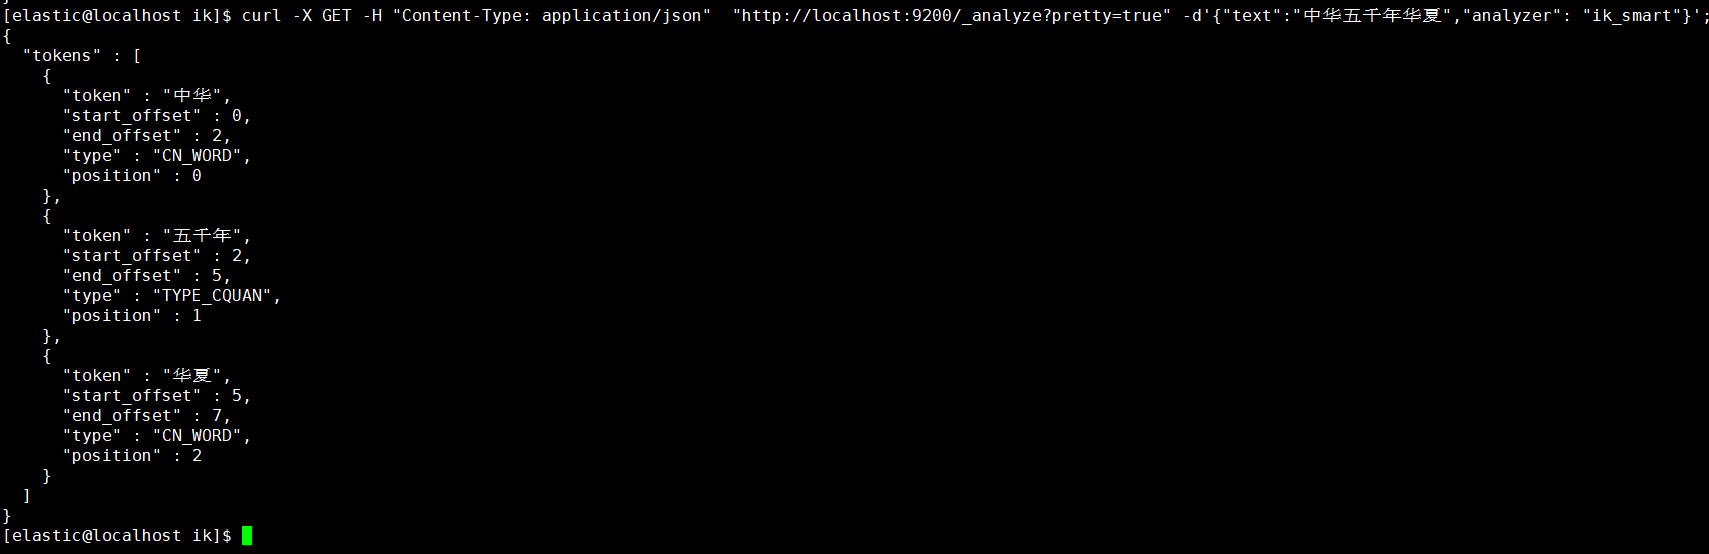
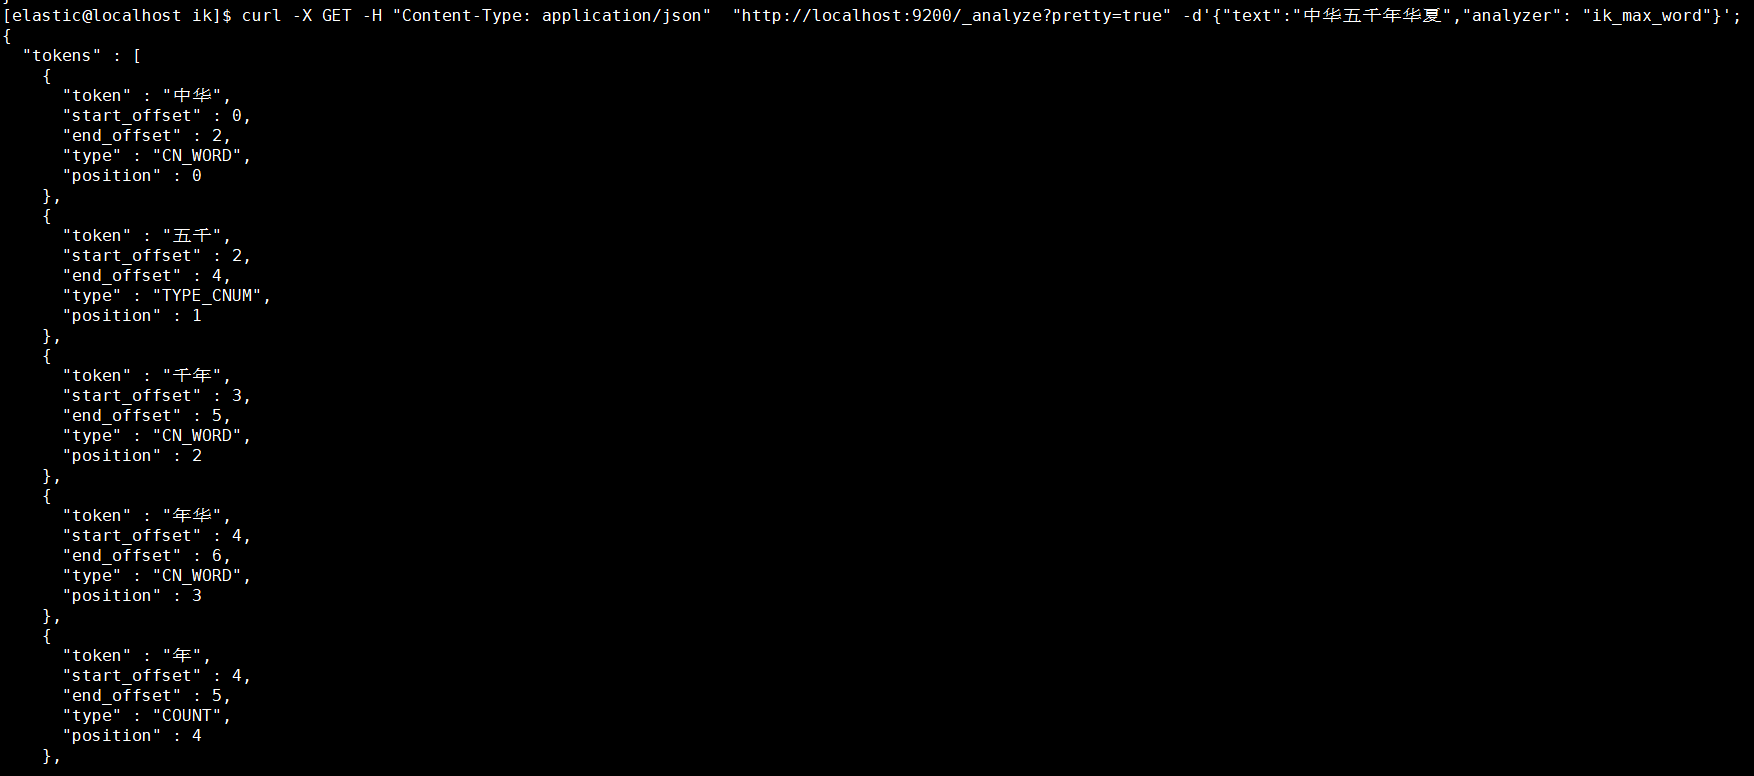
1.3.3. ik_max_word和ik_smart
ik_max_word: 将文本按最细粒度的组合来拆分,比如会将“中华五千年华夏”拆分为“五千年、五千、五千年华、华夏、千年华夏”,总之是可能的组合;
ik_smart: 最粗粒度的拆分,比如会将“五千年华夏”拆分为“五千年、华夏”
当不添加分词类别,Elastic对于汉字默认使用standard只是将汉字拆分成一个个的汉字,而我们ik则更加的智能,下面通过几个案例来说明。
1.3.3.1. ik_smart分词
在JSON格式中添加analyzer节点内容为ik_smart
1 | [elastic@localhost elastic]$ curl -X GET -H "Content-Type: application/json" "http://localhost:9200/_analyze?pretty=true" -d'{"text":"中华五千年华夏","analyzer": "ik_smart"}'; |
1.3.3.2. ik_max_word分词
在JSON格式中添加analyzer节点内容为ik_max_word
1 | [elastic@localhost elastic]$ curl -X GET -H "Content-Type: application/json" "http://localhost:9200/_analyze?pretty=true" -d'{"text":"中华五千年华夏","analyzer": "ik_max_word"}'; |
1.3.4. 自定义分词
IK 很友好,为我们提供热更新 IK 分词,在配置文件 {ES_HOME}/plugins/ik/config/IKAnalyzer.cfg.xml
1 |
|
我们一般将需要自动更新的热词放在一个UTF8的txt文件里,再利用 nginx ,当 .txt 文件修改时,http server 会在客户端请求该文件时自动返回相应的 Last-Modified 和 ETag。可以另外做一个工具来从业务系统提取相关词汇,并更新这个 .txt 文件。
1.4. 索引
写到现在,终于到了索引(Index)这块啦,我们先弄清楚索引的基本概念以及索引到底是什么?
ElasticSearch 是文档型数据库,索引(Index)定义了文档的逻辑存储和字段类型,每个索引可以包含多个文档类型,文档类型是文档的集合,文档以索引定义的逻辑存储模型,比如,指定分片和副本的数量,配置刷新频率,分配分析器等,存储在索引中的海量文档分布式存储在ElasticSearch集群中。
ElasticSearch是基于Lucene框架的全文搜索引擎,将所有文档的信息写入到倒排索引(Inverted Index)的数据结构中,倒排索引建立的是索引中词和文档之间的映射关系,在倒排索引中,数据是面向词(Term)而不是面向文档的。
1.4.1. 创建索引
由于在ElasticSearch 7.x之后就默认不在支持指定索引类型,所以在在elasticsearch7.x上执行:
1 | { |
执行结果则会出错:Root mapping definition has unsupported parameters(刚开始接触就踩了这个坑,折煞劳资好久)。如果在6.x上执行,则会正常执行。
出现这个的原因是,elasticsearch7默认不在支持指定索引类型,默认索引类型是_doc,如果想改变,则配置include_type_name: true 即可(这个没有测试,官方文档说的,无论是否可行,建议不要这么做,因为elasticsearch8后就不在提供该字段)。
https://www.elastic.co/guide/en/elasticsearch/reference/current/removal-of-types.html
1.4.1.1. 官方例子说明
1 |
|
-d指定了你的参数,这里将这些参数放到了
JSON文件中settings设置内容含义
| name | 价格 |
|---|---|
| number_of_shards | 分片数 |
| number_of_replicas | 副本数 |
| mappings | 结构化数据设置 下面的一级属性 是自定义的类型 |
| properties | 类型的属性设置节点,下面都是属性 |
| epoch_millis | 表示时间戳 |
1.4.1.2. 自定义索引
- 使用
JSON文件创建索引
使用 -d‘@your jsonFile’指定你的JSON文件。下边我创建了一个索引名称为product(可自己定义)的索引。
1 |
|

- 参数形式创建索引
1 | [elastic@localhost elastic]$ curl -H "Content-Type: application/json" -X PUT "http://localhost:9200/twitter?pretty=true" -d' |

1.4.2. 查看索引
1.4.2.1. 全部索引
1 | [elastic@localhost elastic]$ curl -H "Content-Type: application/json" -X GET "http://localhost:9200/_cat/indices?v" |

1.4.2.2. 条件查询
1 | [elastic@localhost elastic]$ curl -H "Content-Type: application/json" -X GET "http://localhost:9200/twitter?pretty=true" |
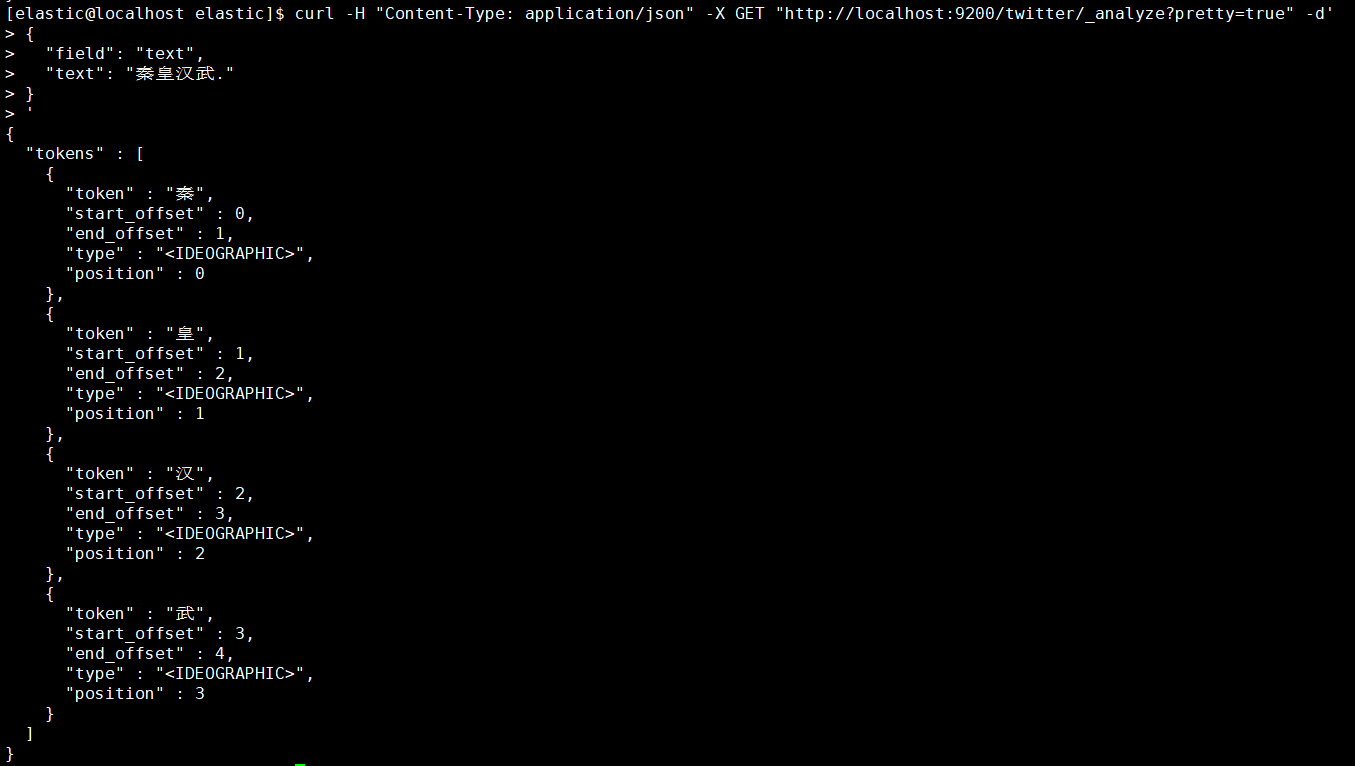
1.4.3. 查看索引分词器
1 | [elastic@localhost elastic]$ curl -H "Content-Type: application/json" -X GET "http://localhost:9200/twitter/_analyze?pretty=true" -d' |
1.4.4. 修改索引
1.4.5. 删除索引
1 | [elastic@localhost elastic]$ curl -H "Content-Type: application/json" -X DELETE "http://localhost:9200/twitter?pretty=true" |
1.5. 如何数据管理
1.5.1. 添加数据
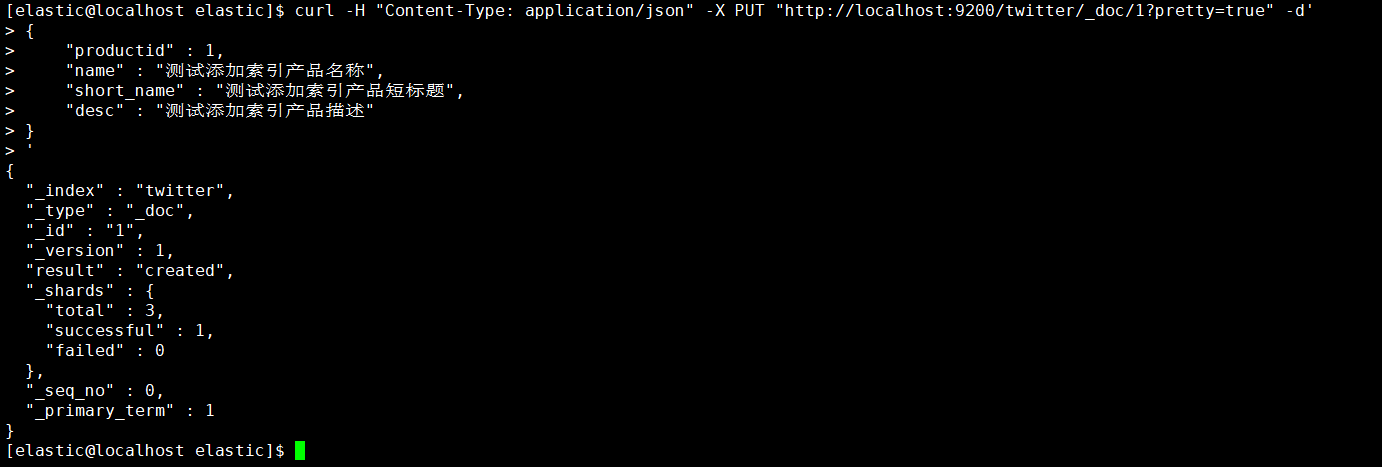
- 这里演示PUT方式为twitter索引添加数据,并且指定id,应当注意此处的默认类型为_doc,还有一种就是采用POST方式添加数据,并且自动生成主键,本文就不再演示,请自行查阅相关材料。
1 | [elastic@localhost elastic]$ curl -H "Content-Type: application/json" -X PUT "http://localhost:9200/twitter/_doc/1?pretty=true" -d' |
执行返回结果如图,则添加数据成功。
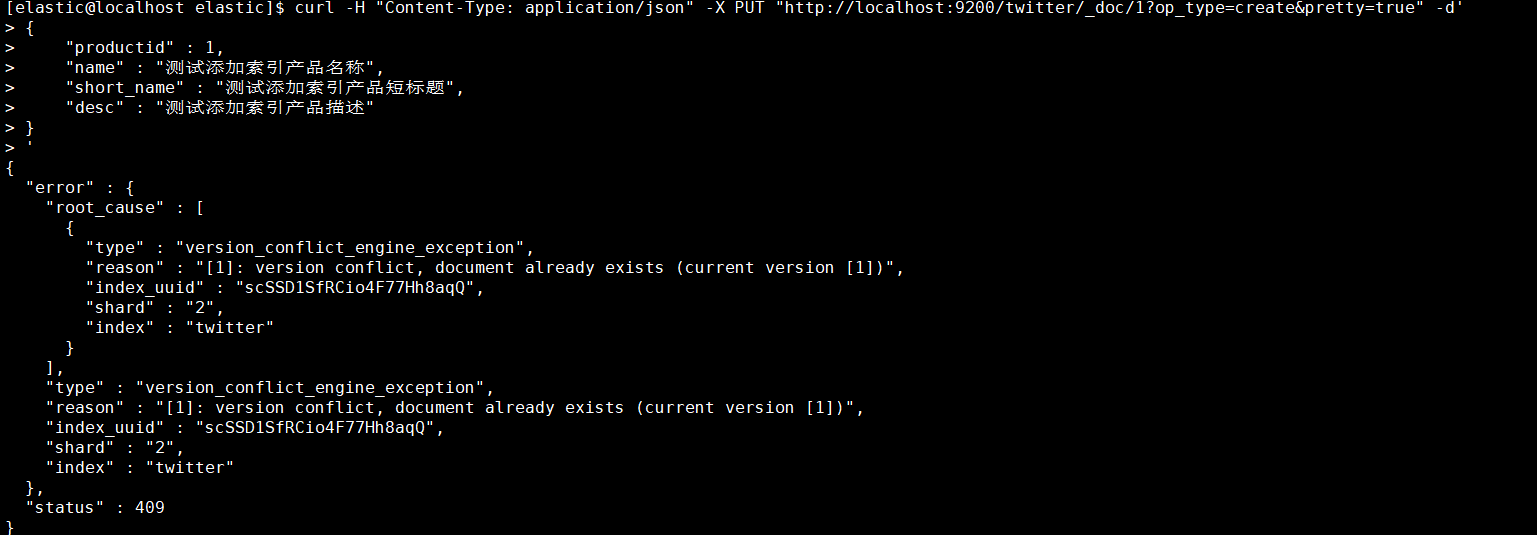
- 指定id为1,还可以加上参数op_type=create,这样在创建重复id时会报错导致创建失败,否则会更新该id的属性值。
1 | [elastic@localhost elastic]$ curl -H "Content-Type: application/json" -X PUT "http://localhost:9200/twitter/_doc/1?op_type=create&pretty=true" -d' |
1.5.2. 基础查询
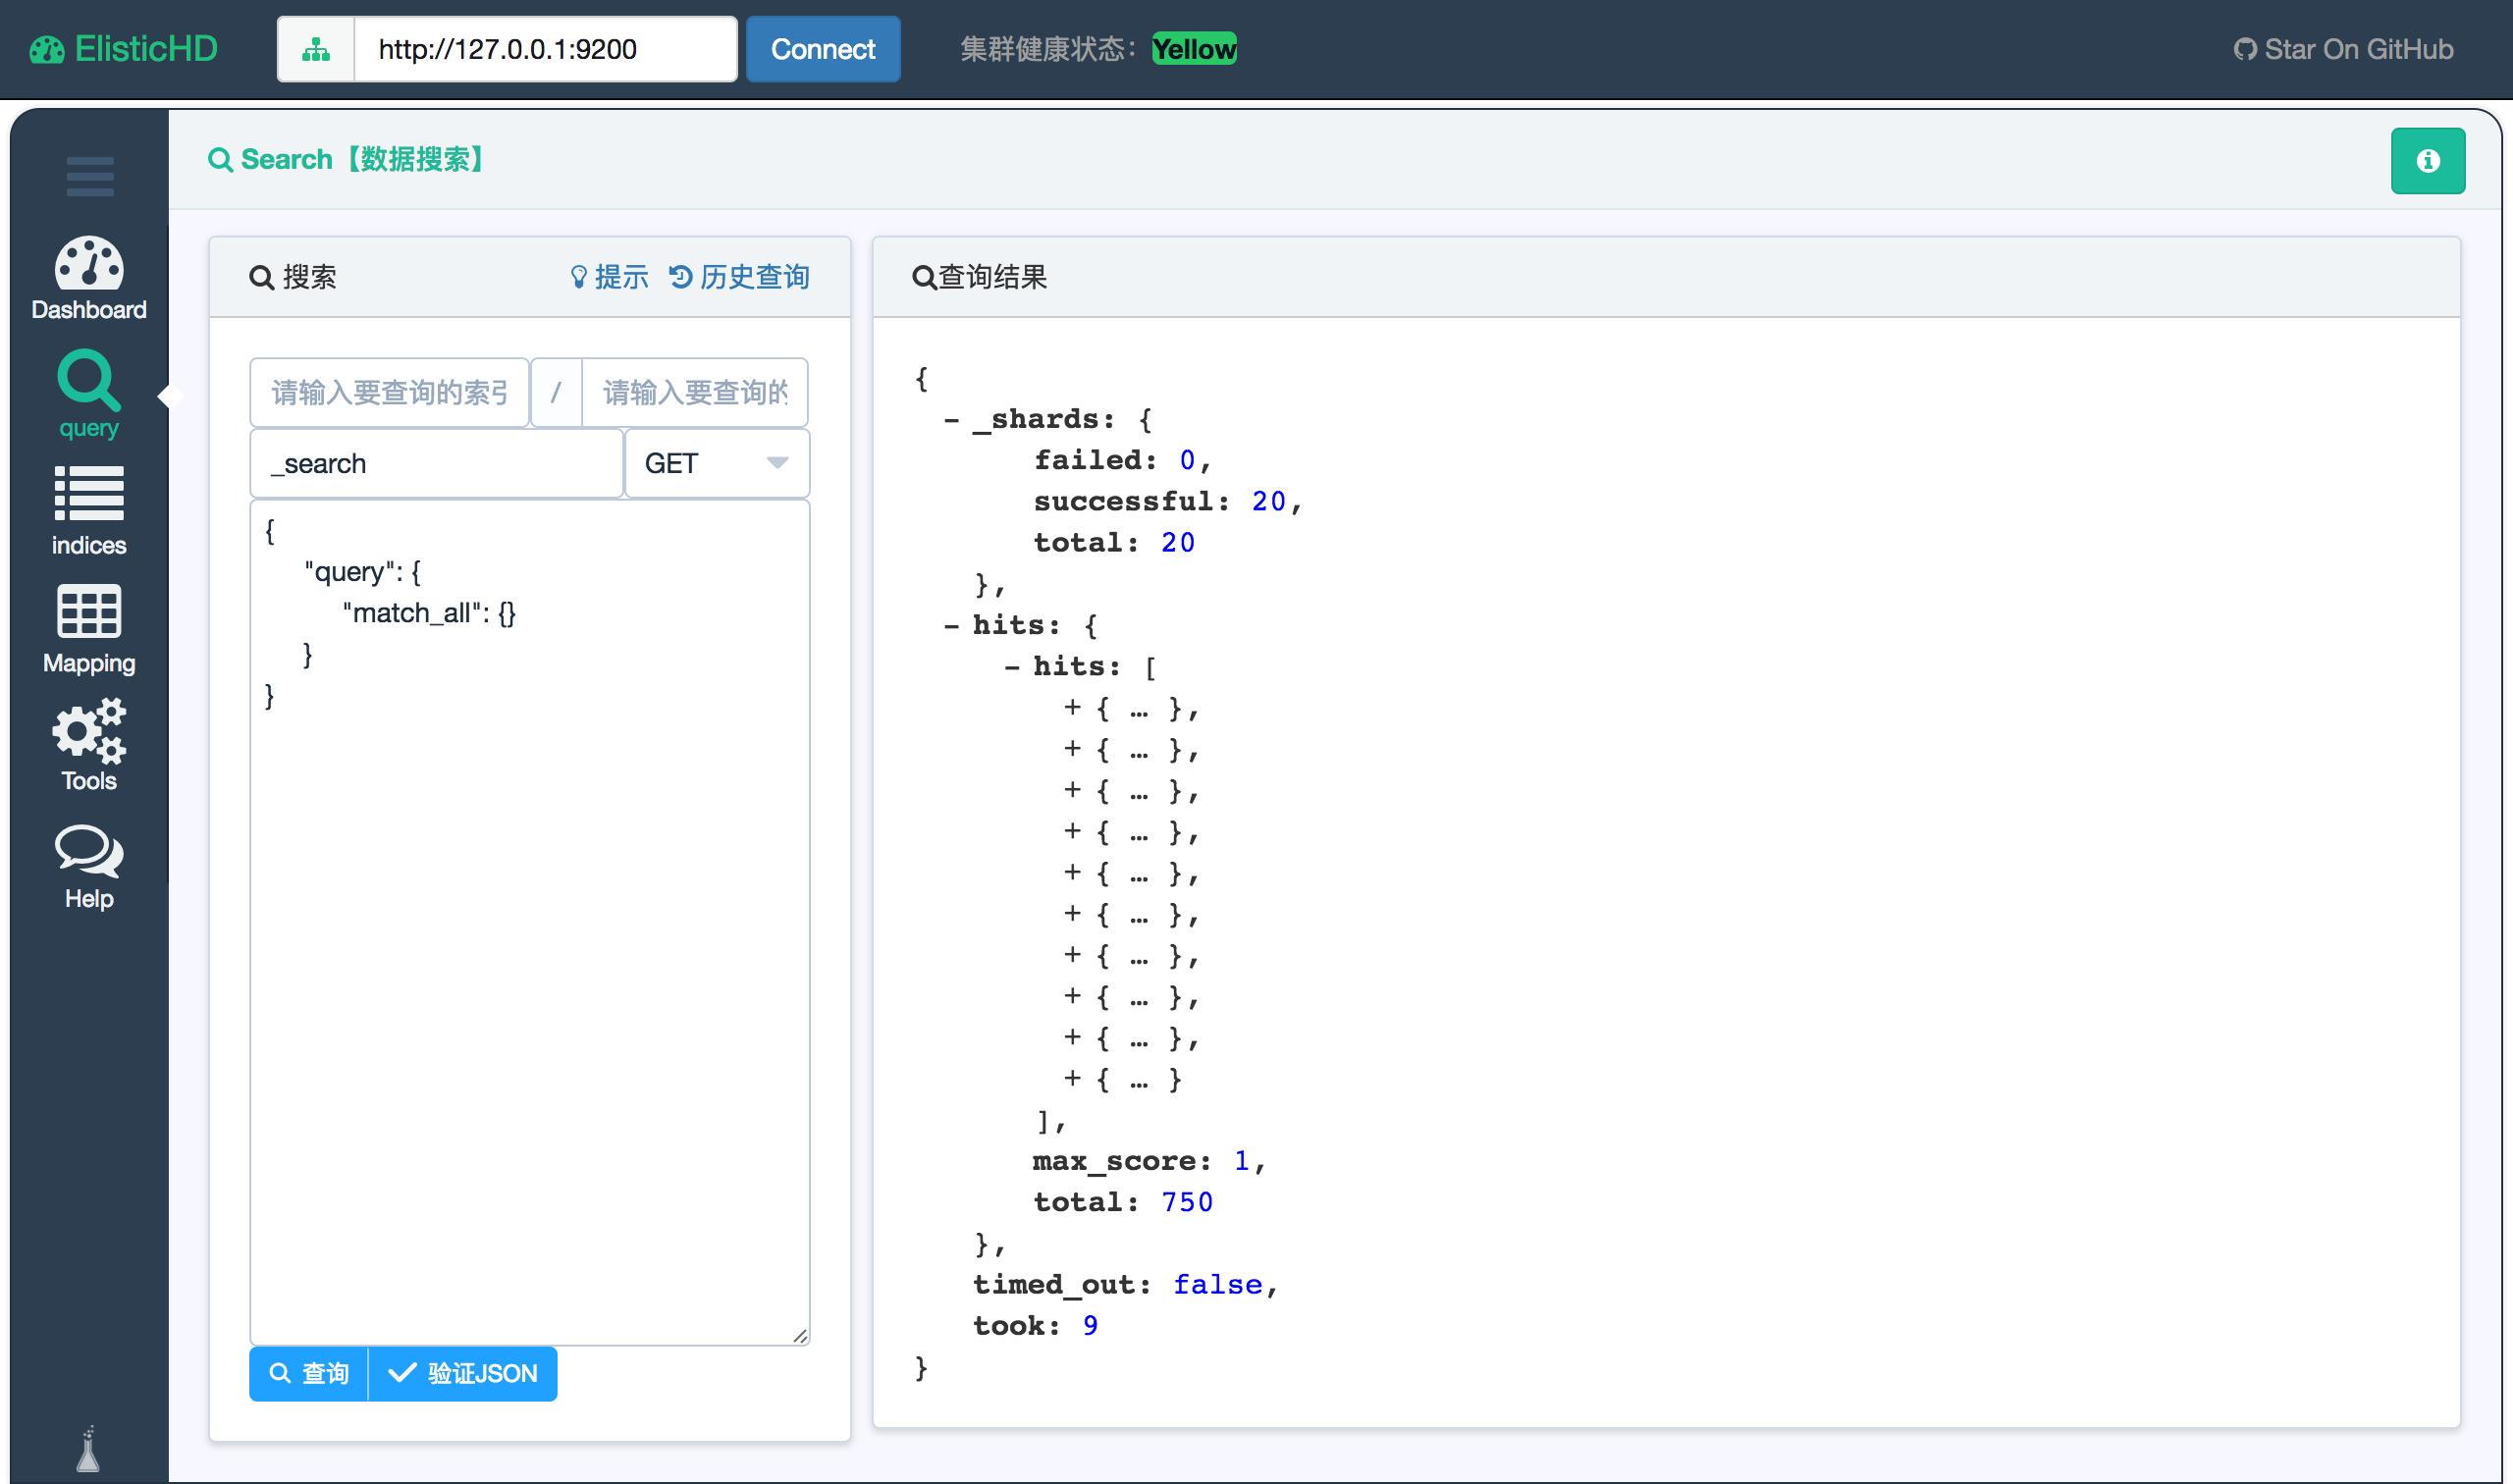
1.5.2.1. 查询所有
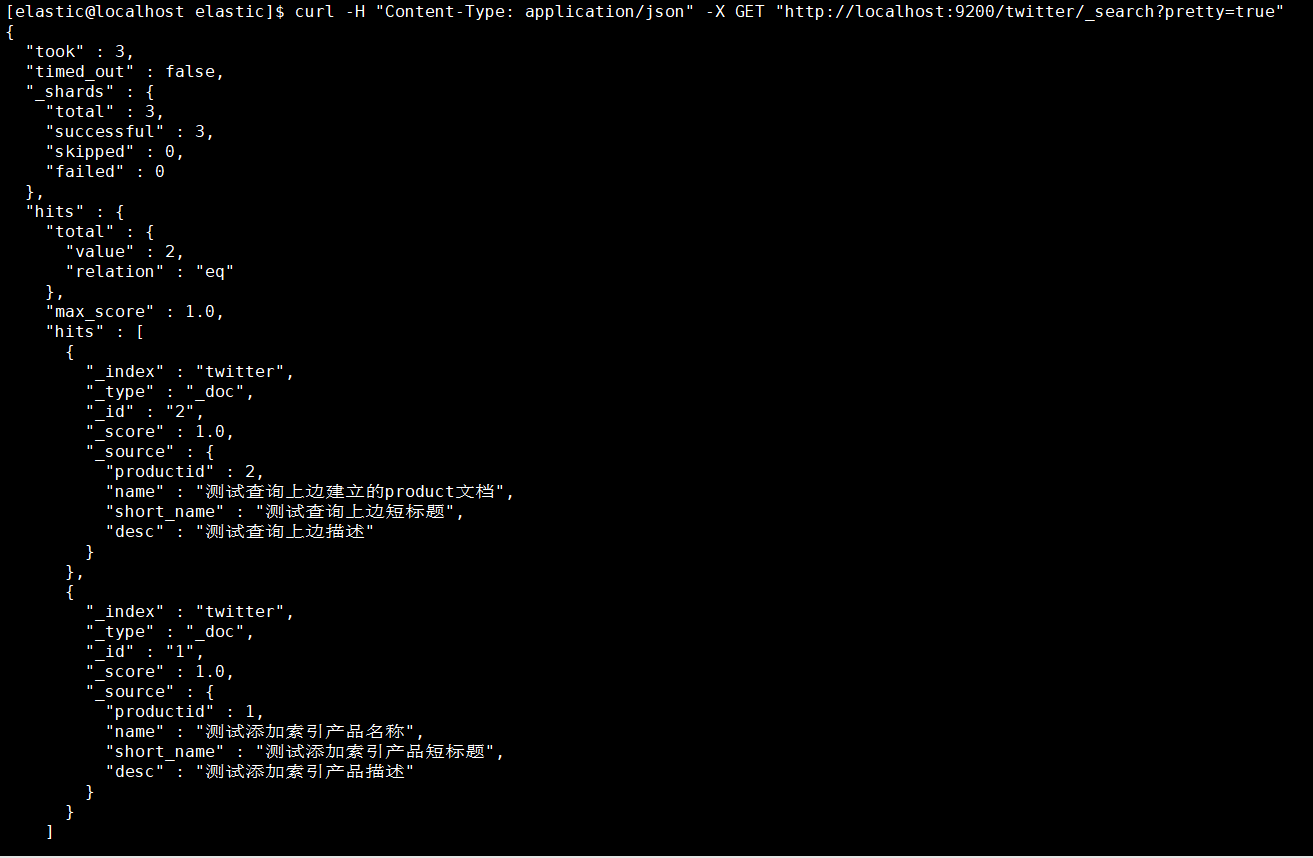
1 | [elastic@localhost elastic]$ curl -H "Content-Type: application/json" -X GET "http://localhost:9200/twitter/_search?pretty=true" |
1.5.2.2. 条件查询
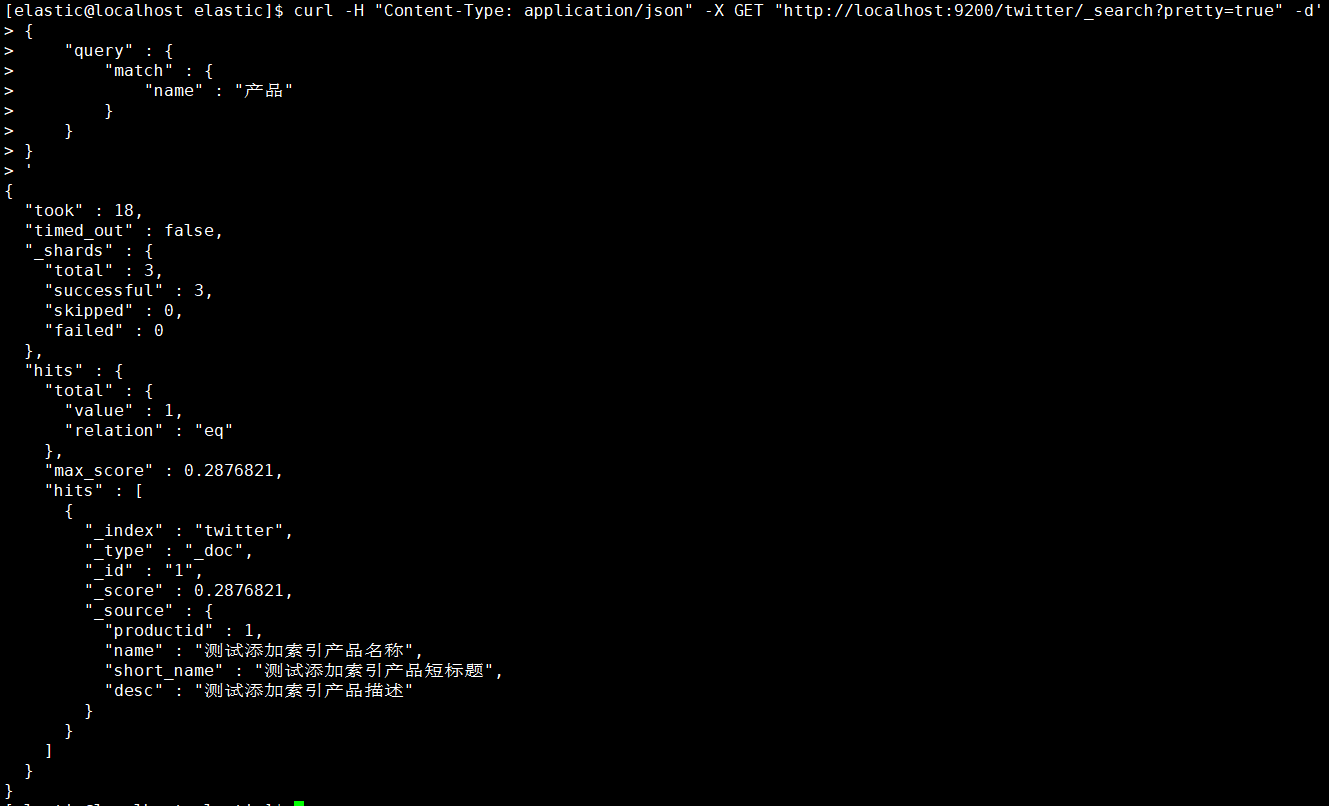
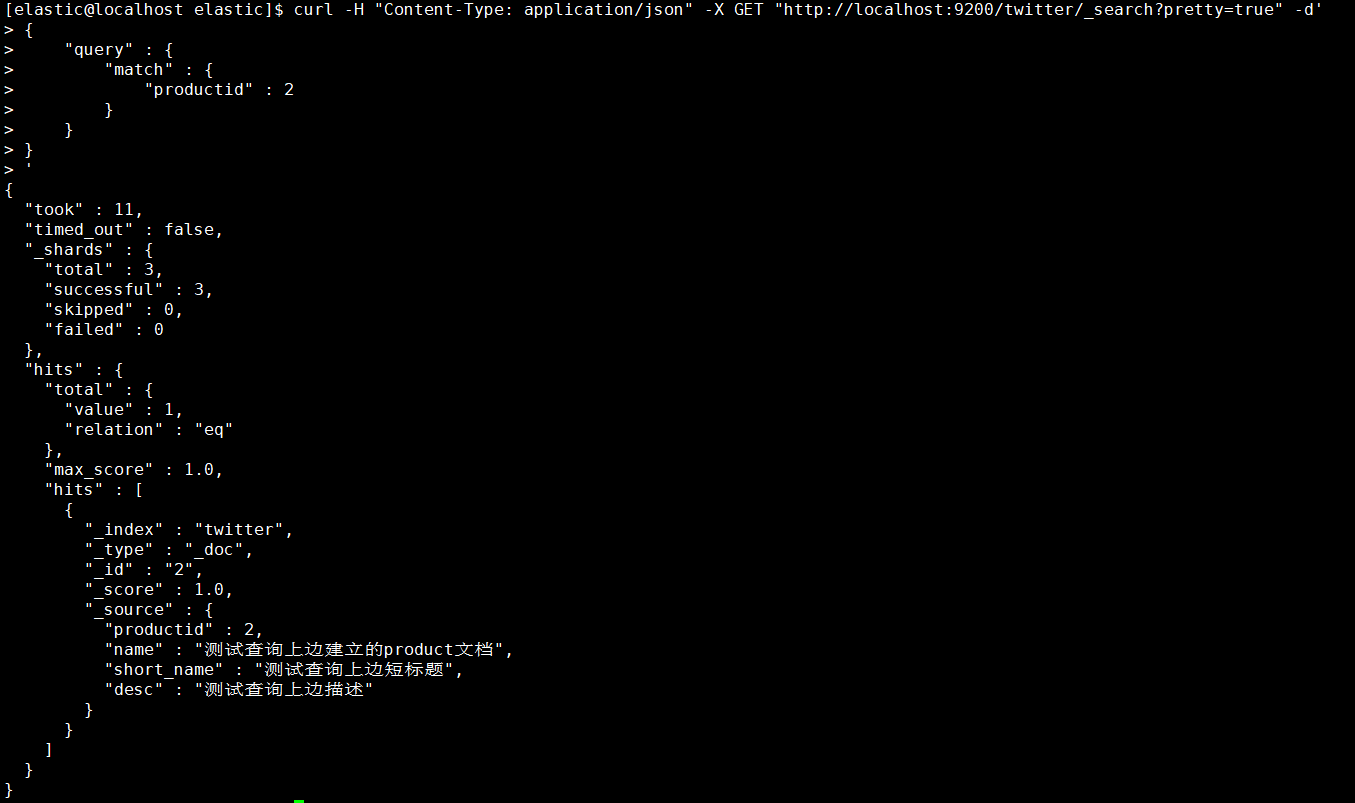
条件查询会涉及到精确词查询、匹配查询、多条件查询、聚合查询四种,分别为”term”、”match”、”multi_match”、”multi_match”。
- 按找数据的名称作为条件查询匹配
1 | [elastic@localhost elastic]$ curl -H "Content-Type: application/json" -X GET "http://localhost:9200/twitter/_search?pretty=true" -d' |
- 按找数据的标识作为条件查询匹配
1 | [elastic@localhost elastic]$ curl -H "Content-Type: application/json" -X GET "http://localhost:9200/twitter/_search?pretty=true" -d' |
- 多条件匹配
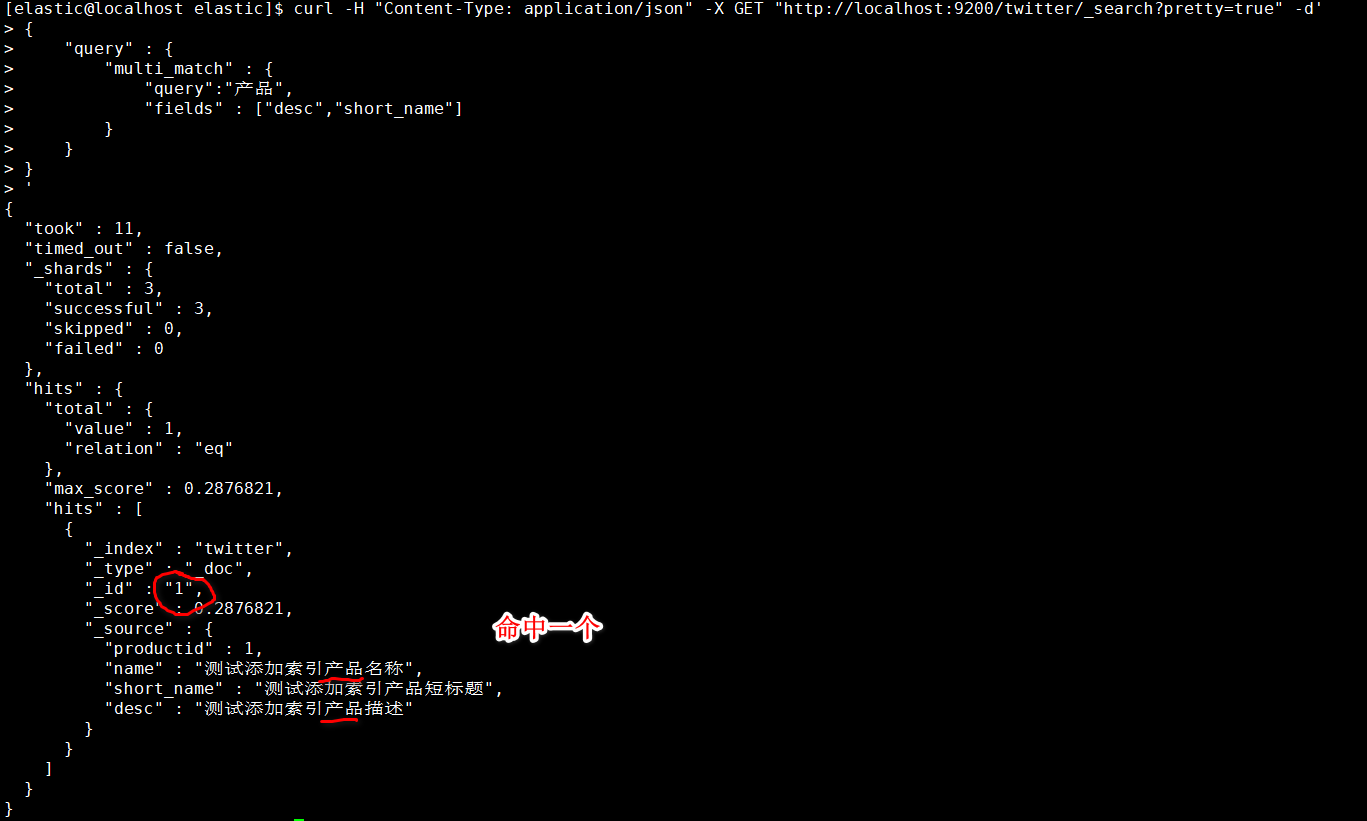
选择匹配desc、short_name列作为多条件
1 | [elastic@localhost elastic]$ curl -H "Content-Type: application/json" -X GET "http://localhost:9200/twitter/_search?pretty=true" -d' |
- 当没有匹配任何数据适合则如下:
1
2
3
4
5
6
7
8
9
10
11
12
13
14
15
16
17
18
19
20
21
22
23
24
25
26
27[elastic@localhost elastic]$ curl -H "Content-Type: application/json" -X GET "http://localhost:9200/twitter/_search?pretty=true" -d'
> {
> "query" : {
> "match" : {
> "productid" : 100
> }
> }
> }
> '
{
"took" : 1,
"timed_out" : false,
"_shards" : {
"total" : 3,
"successful" : 3,
"skipped" : 0,
"failed" : 0
},
"hits" : {
"total" : {
"value" : 0,
"relation" : "eq"
},
"max_score" : null,
"hits" : [ ]
}
}
1.5.3. 高级条件查询
1.5.3.1. 权重boost查询
指定一个boost值来控制每个查询子句的相对权重,该值默认为1。一个大于1的boost会增加该查询子句的相对权重。
索引映射定义的时候指定boost在elasticsearch5之后已经弃用。建议在查询的时候使用。
1 | [elastic@localhost elastic]$ curl -H "Content-Type: application/json" -X GET "http://localhost:9200/twitter/_search?pretty=true" -d' |
1.5.3.2. 过滤coerce查询
数据不总是我们想要的,由于在转换JSON body为真正JSON 的时候,整型数字5有可能会被写成字符串”5”或者浮点数5.0。coerce属性可以用来清除脏数据。
一般在以下场景中:
- 字符串会被强制转换为整数
- 浮点数被强制转换为整数
1.5.3.2.1. 创建索引
1 | [elastic@localhost elastic]$ curl -H "Content-Type: application/json" -X PUT "http://localhost:9200/wongs?pretty=true" -d' |
1.5.3.2.2. 创建第一个数据
1 | [elastic@localhost elastic]$ curl -H "Content-Type: application/json" -X PUT "http://localhost:9200/wongs/_doc/1?pretty=true" -d' |
结果为成功,说明col_1列数据没问题。
1.5.3.2.3. 创建第二个数据
1 | [elastic@localhost elastic]$ curl -H "Content-Type: application/json" -X PUT "http://localhost:9200/wongs/_doc/1?pretty=true" -d' |
由于不能被格式化,数据新增失败。
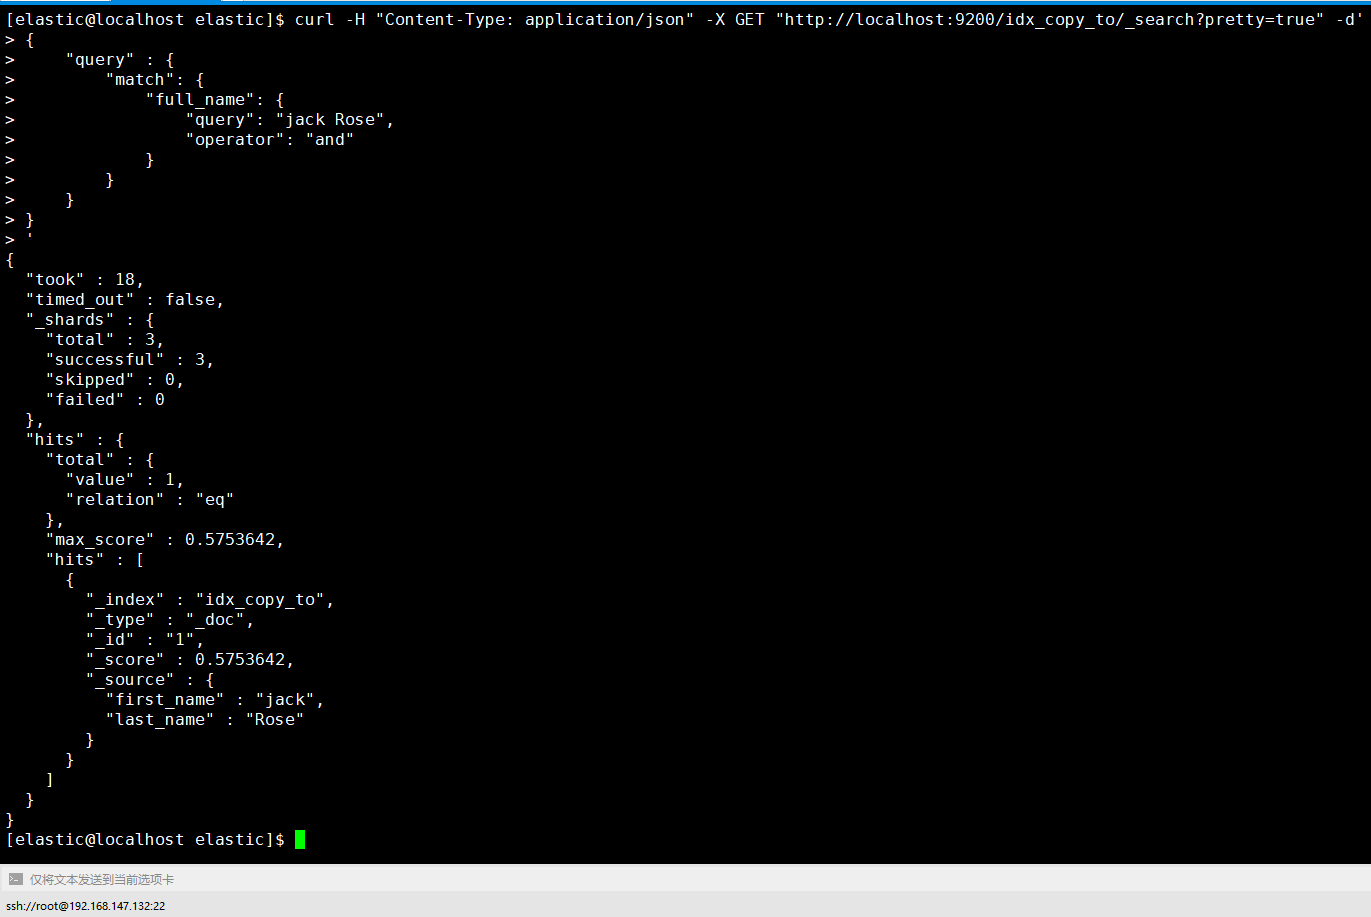
1.5.3.3. copy_to
copy_to允许你创造自定义超级字段_all. 也就是说,多字段的取值被复制到一个字段并且取值所有字段的取值组合, 并且可以当成一个单独的字段查询.
如,first_name和last_name可以合并为full_name字段。
1.5.3.3.1. 定义索引
1 | [elastic@localhost elastic]$ curl -H "Content-Type: application/json" -X PUT "http://localhost:9200/idx_copy_to?pretty=true" -d' |
1.5.3.3.2. 新增数据
1 | [elastic@localhost elastic]$ curl -H "Content-Type: application/json" -X PUT "http://localhost:9200/idx_copy_to/_doc/1?pretty=true" -d' |
1.5.3.3.3. 查询数据
1 | [elastic@localhost elastic]$ curl -H "Content-Type: application/json" -X GET "http://localhost:9200/idx_copy_to/_search?pretty=true" -d' |
从下图中得知first_name和 last_name字段取值都被复制到 full_name 字段。
1.5.3.4. doc_values
是为了加快排序、聚合操作,在建立倒排索引的时候,额外增加一个列式存储映射,是一个空间换时间的做法。默认是开启的,对于确定不需要聚合或者排序的字段可以关闭。
1 | [elastic@localhost elastic]$ curl -H "Content-Type: application/json" -X PUT "http://localhost:9200/idx_doc_val?pretty=true" -d' |
1.5.3.5. dynamic
默认情况下,字段可以自动添加到文档或者文档的内部对象,elasticsearc也会自动索引映射字段。
1 | [elastic@localhost elastic]$ curl -H "Content-Type: application/json" -X PUT "http://localhost:9200/idx_dynamic?pretty=true" -d' |
2. 构建集群模式
待完善
3. 源码
Github演示源码 ,记得给Star
Gitee演示源码,记得给Star
4. 相关章节
一、SpringBoot集成Elasticsearch7.4 实战(一)